| Home | Papers | Reports | Projects | Code Fragments | Dissertations | Presentations | Posters | Proposals | Lectures given | Course notes |
|
|
Dj-ing under Linux with BpmdjWerner Van Belle1* - werner@yellowcouch.org, werner.van.belle@gmail.com Abstract : BpmDj provides the digital DJ with QT based tools to analyze, manage and play mp3/ogg songs. The program annotates all songs with psychoacoustic properties, including tempo, sound color, echo/delay information, rhythm information and composition information. The program relies on mplayer, ogg123 and/or mpg123 to decode songs while output is send through alsa or oss drivers. This article demonstrates beatmixing (how a DJ can superimpose two songs during longer times) and automixing (how BpmDj can mix music for you). It further sheds some light on the psychoacoustic properties used and a feature called beatgraphs.
Keywords:
bpmdj, meta data extraction, tutorial |
1. Dj-ing with BpmDj
1.1. Installing & Setting up BpmDj
BpmDj requires Qt3.1, alsalib (libasound), FFTW 3.0 (libfftw) and some external players which can be mplayer (1.0pre6-3.3.5 or 1.0pre7-3.3.5), mpg123 or ogg123. Those need to be downloaded and installed separately. After downloading BpmDj (see links) unzip the file:
tar -xvzf ../Desktop/bpmdj-3.1.bin.tgz
One can the choose to install the binaries into '/usr/local/bin' or '/usr/bin/' using
cd bpmdj-3.0
cp * /usr/bin/
or choose to run it from the local directory by extending the PATH variable
export PATH=.:~/bpmdj-3.1/:$PATH
before starting the program.
After installing BpmDj, one should create two directories: index and music. The music directory needs to contain the .mp3 and .ogg files, while the index directory will contain all meta-information about these songs. Copy a number of your favorite songs into the music directory and then start kbpm-dj:
mkdir music
mkdir index
cp <myfavoritesongs> music
kbpm-dj
A number of dialog boxes will guide you. To summarize the setup process: one must first import songs into the database (Management|Import Songs), set up an analyzer (choose the standard one, don't forget to configure it by pressing the Configure button) and queueue the imported songs for analysis. To be useful, BpmDj needs at least access to two soundcards on one or more computers, which should both be set up in Program|Preferences|Player.
1.2. The Mixing Desk
BpmDj requires an external mixing desk to blend the multiple audio streams generated by the players. This makes it possible to use specialized external audio effects. We will now briefly touch upon a mixing desk as to provide insight into the standard tools available for a DJ.
Normal mixing tables have a number of channels, which in our situation, will take input from the sound cards. Every channel has a gain to change the pre-amplification of the signal before it goes to the volume fader. The gain should be set as high as possible without clipping or distorting the music. Every channel also has a number of equalizers to change the intensity of low, middle and high frequencies. Many DJ's tend to turn the equalizers fully 'open' (at +15dB), which gives the sound a distinct techno feel but is in general not necessary. To remain true to the original song one can set the equalizers to neutral: 0 dB. Below the equalizers, one regularly finds the volume slider that changes the volume flowing to the main mix. Further, the mixing desk should have pre-fader listen (PFL) buttons. Pushing this button routes the signal of that channel (after equalizing, but before the volume changes) towards the headphone/monitors. This allows the DJ to tune and position a song without interfering with the main output stream enjoyed by the audience. The volume indicator can show the current PFL signal or the main signal. With these basic tools one can start mixing.
1.3. Playing the first song
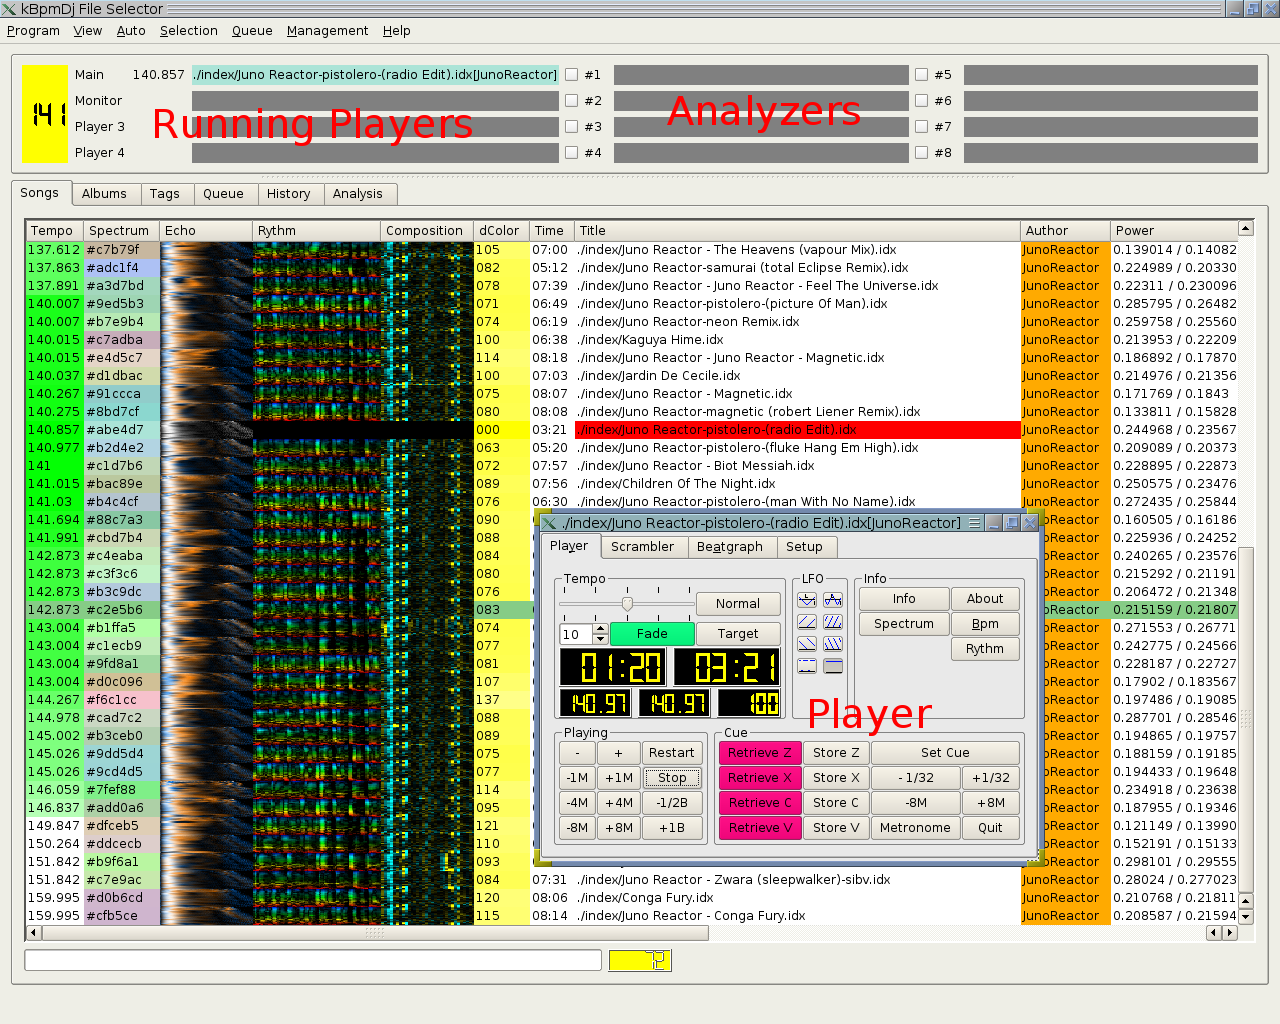 After starting
kbpm-dj, the program presents a
list of available songs, annotated with various colorful pictures.
Double clicking a song will start playing it. The first song will be
considered to be the main song. Otherwise, it will be considered a
monitor song. When a monitor song starts, it will play at the tempo
of the main song. To start our first mix we do the following:
After starting
kbpm-dj, the program presents a
list of available songs, annotated with various colorful pictures.
Double clicking a song will start playing it. The first song will be
considered to be the main song. Otherwise, it will be considered a
monitor song. When a monitor song starts, it will play at the tempo
of the main song. To start our first mix we do the following:- Zero the gain and volume of the first channel
- Double click your
first song
- Change the gain until we have maximum PFL signal without clipping. Don't use the volume slider in this process. If equalisation is necessary, this should be done now as well. When you equalise, don't forget to appropriately alter the gain again.
- Now you can crank up the main volume (to scare your neighbours) or keep it civilzed (and use headphones).
1.4. Selecting the next song
To help you choose the next song, BpmDj provides a distance metric between songs. When a main song is available, the dColor column shows the distance between the listed and the main song. The distance metric takes into account all the information gathered during the analysis phase, including tempo, sound color, echo, rhythm and composition properties. The DJ can now decide to stick to the same type of music and select the best match (smallest distance), or choose to alter the course of his/her set and select a song that is close (within dColor range) but still far enough to be different (the perfect marriage). If you have chosen your second song,
- Place the volume slider of the second channel to zero (the audience should not hear what you plan to play).
- Zero the gain of the second channel (we don't want to become deaf due to a mismatch in gain between the current and previous song).
- Turn the first song PFL off and the second song PFL on (we only want to hear the new signal such that we can set its gain appropriately).
- Double click your second song.
- Change the gain until we have maximum PFL signal without clipping
1.5. Placing a cue in the second song
Now that the second song plays, we need to determine which section of the song we would like to use. The start of this section will be our cue-position. To set a cue, it is important to listen to the music and synchronize to the beginning of every 4th or 8th measure (8 measures = 32 beats). When such a phrase starts, press the '/' key. BpmDj will stop the song and remember this position. Pressing space will jump back to that cue and restart the song. There are 4 persistent cues. These are called the Z-cue, the X-cue, the C-cue and the V-cue. Pressing the capital 'Z', 'X', 'C' or 'V' stores the current cue into that memory position. Jumping to a cue is done by pushing the small 'z', 'x', 'c' or 'v'.
- Listen to the second song and find the beginning of a phrase. Then press '/'
- To position the cue accurately, use the '(' and ')' keys. These will shift the cue forth or back with 1/64 note. (One can also shift the cue 8 full measures using '{' and '}' keys)
1.6. Beat mixing the second song
BpmDj has taken care to play the new song at the tempo of the first song. This means that our second song can now naturally be blended with the first one, without explicitely watching their tempo. However, to have a proper blend we need to wait for the right moment to kick in the new song. A beatmix superimposes the beats of two songs over a longer period, during which a slow crossfade can be performed. Practically,
- Put on the PFL of both channels.
- Find the beginning of a phrase in the first song. When the next phrase starts, press the space bar to start the song.
- Very likely the song will not exaclty start synchronized. If the song is somewhat too late or too early, nudge it back/forth with the '-'/'+' key.
- Once the two songs are properly superimposed we crossfade and close the player of the first song. During crossfading, don't forget to turn off both PFL's.
- During the crossfade the two songs remain synchronized for some time, but not forever. If a song starts drifting too early, use the nudge keys ('-' and '+') to reposition it, thereby watching the hihats (these are easy detectable and tend to provide a greater accuracy than the temporal wide sound of bass drums).
- Now our second song has become the main song. Therfore we should return it to its normal tempo by pressing the fade button in the second player. Once the button becomes green, it has reached its normal tempo.
- Quit the first song by pressing escape on the player window. Once the main song closes, the monitor will become the main song.
1.7. Bpm Tricks
Because BpmDj has exact tempo information and can access the audio stream at random, some magic things can be done. For instance, it is possible to jump back and forth by measures, or jump to a cue whilst preserving the relative positioning within a measure. Pressing 1,2,4,5 or 7,8 makes the player jump back or forth by respectively 1,4 or 8 measures (try to do this on turntables, or with CD's !).
This can be used for well planned breaks. If one listens to the first song and start the second song in phase with the first, then one can jump back the second song before the snare-roll and nicely mix it into the final stream. Without the ability to jump back measures this could be quite complicated.
BpmDj also provides a set of Low Frequency Oscilators (LFO's) that synchronize to the songs' tempo. Those LFO's are: pan, saw-up, saw-down and break. The saw-down LFO forms an excellent tool to position cues accurately. If you have set a cue, one can stop the music and press 'r'. Now the music will be sliced into segments with the size of a beat. If the cue is too early one perceives some noise, a beat and then the rest (press ')' in that case). If the cue is too late one tends to miss the punch of the beat (press '('). An LFO can be switch of by pressing 'n'.
2. Beatgraphs
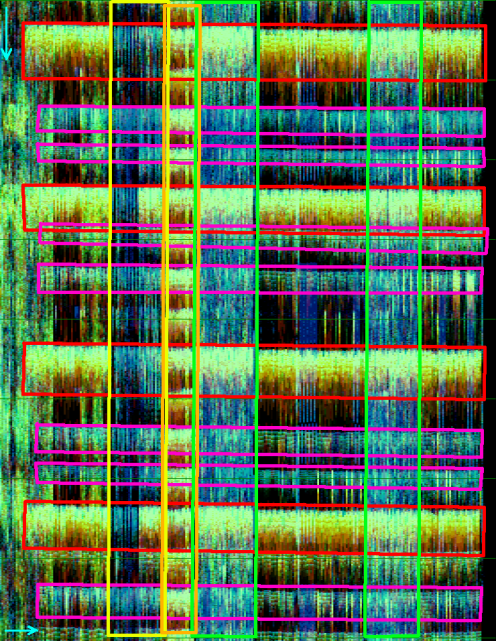
BpmDj contains a feature, the
beatgraph, which can help to spot breaks and tempo changes.
Horizontally, the beatgraph visualizes the different measures, while
vertically the content of one such measure is visualized. The
intensity of a pixel reflects the RMS energy at that position. If the
measured tempo is correct, the beatgraph shows distinct visual bands.
When the tempo is wrong or multiple tempos are present (or the
drummer of the group doesn't care about his accuracy), then the
beatgraph will show a distinctive drifting look. The beatgraph can be
accessed as a tab in all players. When wavelets are used to visualize
the beatgraph, then red
colors are low frequencies and blue colors are high frequencies. All
other colors lie in between. A beatgraph should be read from top to
bottom and from left to right: the song starts playing in the topleft
corner goes down for one measure and then continues in the next
column until it finishes bottomright.
Figure
2 shows 4 bassdrums in every measure (the
red boxes). Every beat has multiple frequencies at the start (yellow)
which then fade out into the bass frequencies (the red tail). The
purple boxes show the position of hi-hats and claps. The two green
strokes indicate some bars containing high frequencies. The yellow
stroke covers an area without bassdrum, while the orange stroke
covers an area with double bassdrums (every 1/8 of a note instead of
every 1/4th). When DJ-ing, the beatgraphs reveals in advance gaps,
breaks and tempo switches.
3. The BpmDj Analyzers
We will now briefly turn our attention to the various properties analyzed by BpmDj.
Tempo - The BpmDj BPM counter is accessible via the 'BPM-counter' button of the player window. Five different tempo measurement techniques are available of which autocorrelation and ray-shooting are most appropriate. Both determine the tempo by horizontalizing the beathgraph. A tapping Bpm counter is available if the automatic one picks the wrong harmonic.
Sound Color - is measured through spectrum analysis, which measures the presence of specific frequencies in a song. To respect the sensitivity of the human ear, the output of the spectrum analysis is binned into the 24 critical bands of the Bark psychoacoustic scale. In this scale tones with a pitch in the same band will mask each other.
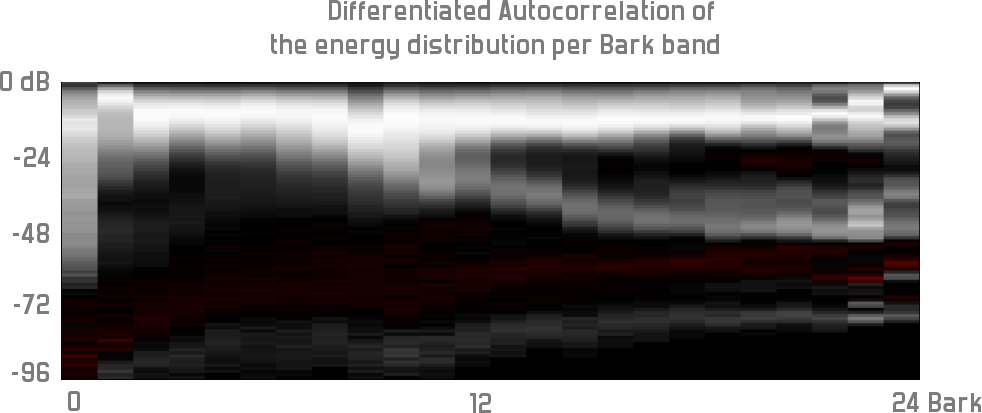
Histogram Analysis - measures
for every Bark band the distribution of sound intensity in the song,
and thus in a way reflects the kind of echo, delays and accents
present. Figure 3 has 24
bark bands (0 being low, 24 being high frequencies). The first band
shows how the lower bass has a relative uniform occurrence (the bass
of a bassdrum decreases slowly and thus occurs at a wide range of
intensities). The second bark band (covering the body of a bassdrum)
shows a large probability to always occur with the same intensity.
From band 12 on a split in the diagram occurs, indicating that the
hi-hats have an accent (they can occur at -6 dB or at -48 dB).
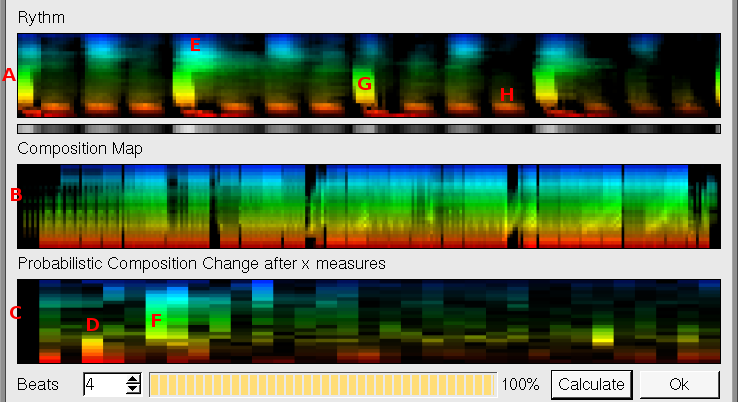
Rhythm Analysis (figure 4) - Pressing the 'Rhythm' button in the main player window accesses the rhythm analyzer. The window contains three distinct panels, all with a vertical Bark scale. Panel A shows the overall content of one measure. Horizontally, one measure is visualized with 4 beats (position G is the 3th beat). The hihats are spaced between the beats (E), and a 1/16 monotone baseline is present (H). Every 2 beats has a 'crash' cymbal (the longer green trail after the E).
Composition Analysis - Panel B shows the bark intensity for all measures. It shows the entire song from left to right. In this particular case some filter upsweeps are present. The information calculated in B then to the composition property in the next panel. Panel C shows the probability that the intensity at a specific bark band changes after a number of measures. Position D shows a large probability that the low frequencies change after 4 measures, which can either mean that the beat stops or starts. After 7 measures (F) the higher frequences often change, in order to change again at the next measure. This is a typical break that cuts the hihat (measure 7) before a break (measure 8).
4. Playlist Automation
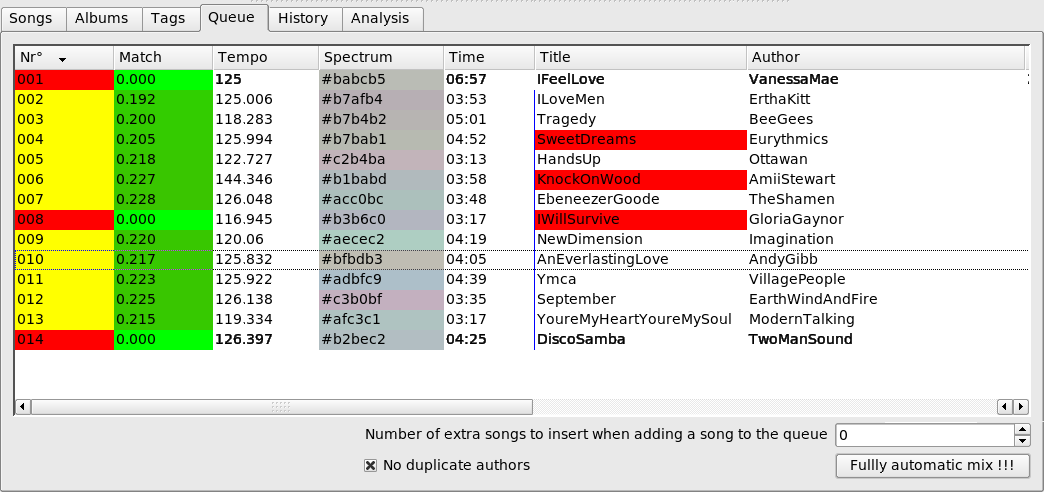
Because BpmDj has these well defined properties, together with a distance metric, it is possible to automatically find song that belong between two other songs, and thus create playlists automatically. To create such a playlist, select a number of songs in the Songs-tab and add them to the queue (press the right mouse button and click 'Add To Queue'). After selecting all songs in the Queue tab, click right and choose 'insert random songs'. This feature is often used to create playlists for aerobics practices (These classes seem to depend on scientifically engineered tempo changes).
5. Automatic Mixing
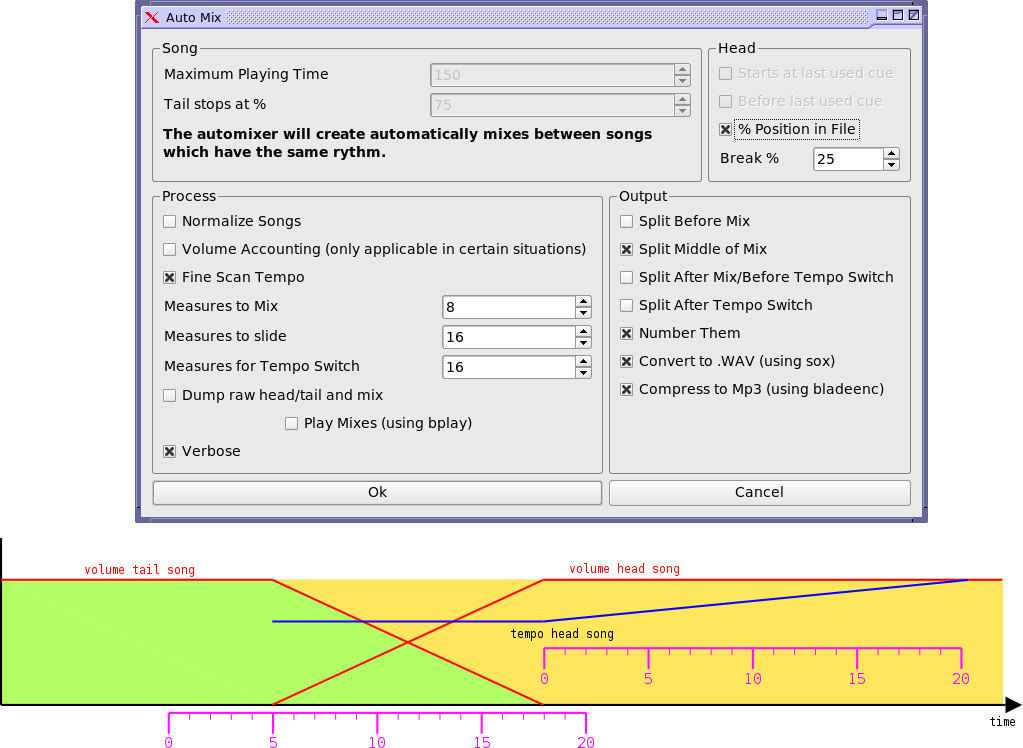
BpmDj
contains an experimental submodule, the
automixer, which can automatically glue together a set of
songs. This can be useful for online radio stations, or to create
mixes for portable mp3 players. The process itself works offline and
succeeds in about 80% of the times (20% of the automated mixes are
wrong, which shows why DJ's can be actually useful :) Good results
can be expected when songs have a compatible rhythm and sound color.
To use the automixer, one must first queued a playlist. Then,
pressing the 'Fully Automatic Mix' button in the Queue-tab will pop
up the automixer. The program can output one big stream or split that
stream into small submodules. Normally, one big raw file (little
endian, 16 bits, 2 channels) is created by gradually appending new
songs to the end of an already existing file. Optionally, this file
can be split into pieces and encoded again. After filling in all
options, one can press Ok and execute the 'process_mix.sh' script on
disk.
6. Conclusion
This article presented a step by step guide on how to use BpmDj to mix music. Although the recipe in the yellow boxes is easy, it requires dedicated practice. We also gave some insight into more experimental features, such as automixing and playlist automation. There remain some other interesting features that have not been discussed. In brief:
- support for up to 4 players
- cluster analysis up to 200 songs
- principal component analysis of the sound color
- non-linear tempo fades guarantee a linear perceived tempo change
- distributed playing/analysis
- automatic normalisation of the intenstity of songs
- keeps track which song you played in the past
- song tags to annotate a particular style of music
Links
Download: http://sourceforge.net/project/showfiles.php?group_id=42658
Setup: http://werner.onlinux.be/BpmDj/setup.html
Step-wise tempo changes: http://werner.onlinux.be/Papers/tempochange06/index.html
Spectrum/echo analysis: http://bio6.itek.Norut.no/werner/Papers/spectrum05/index.html
Tempo analysis: http://werner.onlinux.be/Papers/bpm04/index.html
Meta-data extraction: http://werner.onlinux.be/Papers/bpm05q1/BpmDjQ1.html
Signal processing techniques in BpmDj: http://werner.onlinux.be/Papers/insomnia05/siframes.html
An advertisement movie of BpmDj: http://werner.onlinux.be/Papers/insomnia05/InsomniaAdvertisment.avi
/Me
Dr. Werner Van Belle, originally from Belgium, has been researching mobile multi agent systems and open distributed systems. Now he lives in Norway where he works as a researcher at Norut IT, which is a group specialized in signal processing for earth observation and life sciences. In his spare time he is passionate about digital signal processing for audio applications. He likes to describe himself as a multidisciplinary researcher and is always interested in job offers and/or interesting projects to work in. The author can be contacted by email: werner@onlinux.be, werner.van.belle@gmail.com or werner@itek.norut.no. His homepage is at http://werner.onlinux.be/.
Glossary
cue – a position where a song should jump back to when the player is stopped
equalizer – an equalizer allows one to alter the volume of a specific frequency band.
gain - usually means the ratio of the signal output of a system to the signal input of the system. The gain alters the signal strength of the incoming signal before it is send to equalizers and volume sliders.
main song – the song that is currently routed towards the main channels.
mixing desk – a mixing desk is a piece of hardware that takes input from various audio sources and routes them to a number of output channels. It is essentially an audio 'router'.
monitor song – the song that the DJ is listening to, but which is not send to the main outputs.
PFL – pre-fader listen – used to route the signal towards the headphones, without sending it to the main channels.
| http://werner.yellowcouch.org/ werner@yellowcouch.org |  |