| Home | Papers | Reports | Projects | Code Fragments | Dissertations | Presentations | Posters | Proposals | Lectures given | Course notes |
|
|
The SEESCOA Component SystemWerner Van Belle1* - werner@yellowcouch.org, werner.van.belle@gmail.com Abstract : Most real-time embedded systems are, by nature, multitasking solutions to real-world problems. They typically deal with the interface and control of multiple eternal devices. The different parts of these systems usually run at different priorities and with different run-time characteristcis. The notion of multiple tasks or threads being active in the system at the same time is common. Many of these real-time systems are deployed on a set of microprocessors in a distributed architecture. Designing a solution for this type of problem requires a view other than object oriented systems. This document describes the component system we developed. It describes how it should be used when programming components and it describes how the wystem itself can be adpated. The document is split in 4 parts. The first part describes what a component is and gives a good idea how to think about components (at implementation level). This part is based upon the 'Component Working Definition' deliverable. This section also contains a description of the Component System and what it is supposed to cover. The second part is a discussion about 'event based' vs 'thread based'. The third part describe how we actually can write a component. This is mainly a tutorial. The fourth part describes how we can use and tune the component system to suit our needs.
Keywords:
component based design seescoa syntax asynchrnoous message sending open distributed systems |
Contents
Introduction 4
Components and the Component System 5
Events vs Threads 8
Thread Based Models 8
Event Based Models 9
Writing Components 11
Naming Components 12
Define it as a Component: The componentclass keyword 13
Using the Runtime 13
Using the Precompiler 14
Handling Incoming Messages: The message keyword 14
Using The Runtime 15
Using The Precompiler 15
Sending Messages to Components: .. 15
Using the Precompiler 15
Using the runtime 16
Passing/Retrieving Parameters: <>, <|>, <:> 16
Using the Precompiler 17
Using the runtime 18
Session Parameters: ><, >|<, >:< 19
Using the Precompiler 19
Using the runtime 20
Creation/Initialization 20
Advanced Message Handling: Active/Reactive/Passive 21
Interrupt handling: The active keyword 22
SocketInterruptHandler 22
TimingInterruptHandler 23
Advanced Message Passing 23
Predefined Fields 23
Message Delivery Order 24
Race Conditions/ Deadlocks 25
Example: Http Daemon 25
Httpd 26
Clock 26
AccessCounter 27
HtmlSender 27
HttpdMain 28
Standard Glue Components 29
The Wait Component 29
Dispatcher Component 30
Observable 31
Describing Loops 32
Using The Component System 33
Running The Component System 33
Message Flow 35
Message Handlers 36
The Standard Message Handler 37
The Tracing Message Handler 38
The Timing Message Handler 39
Schedulers 41
Scheduler Provisions offered by the Component System 41
StupidScheduler 43
StandardScheduler 43
EDF Scheduling and Timing contracts 45
Timing Contracts 45
Principles of the scheduler 48
A scenario 49
Possible Extensions 50
The Component System & Embedded Software Development 52
Opportunities for software development 52
Opportunities for embedded software development 52
The Future of the Component System 54
High Priority 54
Low Priority 55
References 56
Introduction
The very nature of real-time embedded applications makes certain characteristics of their implementation (such as timing and implementation architecture) critical. Usually, the software in these applications is responsible for the control of other equipment; so designing a correct solution requires a good expertise to glue non-standardized components together.
Most real-time embedded systems are, by nature, multitasking solutions to real-world problems. They typically deal with the interface and control of multiple external devices. The different parts of these systems usually run at different priorities and with different run-time characteristics. The notion of multiple tasks or threads being active in the system at the same time is common. Many of these real-time systems are deployed on a set of microprocessors in a distributed architecture. Designing a solution for this type of problem requires a new adapted view to components.
This document describes the component system so far. It describes how it should be used when programming components and it describes how the system itself can be adapted. This document is split into four parts:
The first part describes what a component is and gives a good idea how to think about components (at implementation level). This part is based upon the 'Component Working Definition' deliverable. This section also contains a description of the Component System and what it is supposed to cover. The second part is a discussion about 'event based' vs 'thread based'. The third part describe how we actually can write a component. This is mainly a tutorial. The fourth part describes how we can use and tune the component system to suit our needs.
Components and the Component System
A component is a reusable documented entity that is used as a building block for software systems. It is used to perform a particular function in a specific application environment within a specific component system. Components are composed (glued together) using their interfaces. These interfaces consist of provided interfaces and required interfaces. A provided interface describes how the functionality has to be accessed. A required interface describes what is needed to perform this functionality.
In this definition a distinction has to be made between a component blueprint and a component instance. A component blueprint is a description of a reusable software element; a component instance is an instantiation of this description. A component blueprint doesn't have a state, a component instance does. It also doesn't make sense to talk about the runtime properties of a component blueprint; only component instances have runtime properties. This distinction is important for a clear definition. The term component is more general; by using it we mean both aspects.
Component instances are not objects. And as a consequence, component blueprints are not classes. When a component is implemented, it will probably use different objects to perform its functionality (of course in the case an OO language is chosen). Therefore some books talk about components as if they were big objects. This is true to some extent, but limiting the component definition to this would be wrong. A component instance should be thought of as having its own code & data space and also its own reactive behavior. This is necessary to have the ability to use different synchronization principles and make components reusable. A component worked out, thinking it has its own control flow will be more general, than a component which enforces certain calling strategies upon other components.1 Or, a component written in the assumption its memory will be accessed by other components is more specific than a component which doesn't share its data via these kinds of techniques.
As described in an earlier deliverable we distinguish 4 levels of component abstraction. (syntactic, semantic, synchronization and quality of service level). This document deals only with the first, syntactic, level.
The component system is the infrastructure (framework, architecture or kind of operating system), which makes component instances work together, which glues them and creates a homogenous environment for them. The component system can be seen as the middle-ware which connects different components and which makes them work together. To put it differently: the component system provides the streets while the components are the cars driving on it.
The component system:
-
Makes components work. The component system can create and destroy component instances and is able to start and stop component instances.
-
The component system can have support for introspection. When working with components we need the ability to find, name and rename components. These abilities should be provided by the component system. Furthermore, sometimes it is necessary that a client can query a component about its services. Mostly the client is bound to the component's interface at client construction time (e.g. when the client is compiled). When introspection is possible, the client is not bound at client construction time, but it can dynamically (at runtime) find the services of a component. This can be compared to the reflection mechanism in Java.
-
Abstracts the hardware and the operating system such that all components can run in the same environment. The component system offers a standard interface towards all components and offers device dependent components.
-
Handles message passing between components: If a component wants to make another component do something, or whenever the state of another component has to be changed, a message is send to the component in question. Components can send messages to other components using a reference (which can be obtained by using the unique name of the component). The component system takes care of sending data (over a network for example), calling the right function on components and eventually other ways of passing messages between components. This includes changing the data format if necessary, as is done in CORBA. Nevertheless, the component system is not necessarily a distributed environment.
-
The component system handles the scheduling between components. Because components are thought of as active entities it is necessary to map this view to a real operating environment. This is done by the component system, which ensures priorities of messages between components, which takes care of (hard) real time constraints and scheduling in general.
-
The component system has some standard glue components to adapt interfaces between different components. For example, a certain component can return a callback with a specific name, whilst the receiver expects the message with another name. This can be done by certain glue components.
-
The component system should help in debugging by checking whether interfaces are used in the right way. The component system understands the synchronization interfaces provided by the components and can automatically check whether the right calling sequence is used. Another possibility is logging all sent messages.
These things are offered by the component system in the form of a runtime environment (the component system runtime) and a precompiler which transforms 'component code' into suitable Java code. We added a precompiler because it allows us to change the component system runtime without the need of changing all the source code written so far. The precompiler also offers us eventually a possibility to compile to other languages instead of Java.
The component system has a difficult task to offer all these things (especially glue components, the transparent distribution layer and last but not least the timings and timing constraints) together. As such we decided that we needed an very flexible open meta message protocol.
The component system offers this in the form of an asynchronous message delivery system. The choice of an asynchronous event handling system versus a process based system is describes in the next section.
Events vs Threads
The component system is an event based model instead of a process based model. This choice is based upon our experience but may require some more argumentation. In regard to distributed systems and concurrent running programs there are some very essential problems:
-
Deadlocks, which is the result of a proces waiting for a proces which direct or indirect waiting for the original process to do something.
-
Data sharing, which is a problem in distributed environments. If a piece of data is transferred to another machine its state is independent of the original state. This can also lewad to unexpected behavior.
-
Race conditions, which means that the behavior of a program depends upon its execution speed.
It is clear that these problems cannot be esaily solved. Solving these would be rather interesting (to put it eufemistic), but it is not the scope of the project.
To illustrate our choice we will describe both methods, together with their standard solutions, advantages and disadvantages.
Thread Based Models
Summarized: processes run concurrent in a shared data space. They communicate by using shared variables. They synchronize upon variables. Resources are considered as variables (abstract spoken that is)
Advantages:
-
As long as we program processes which minds there own business and doesn't require too much interaction everything is peachy. We can write programs as we would write single threaded programs.
-
If we program correctly and implement a well designed locking strategy into an application we might not have to much dificulties.
-
At the time being this way of working is probably much more performatn than using an event based method.
Disadvantages:
-
Multi threaded programs tends to explode in complexity very quickly if we use a fine grained locking strategy.
-
The complexity of multi threaded programs can be avoided by using a very course locking strategy, and in fact by sequencing the program. In this case threads are useles.
-
Multi threaded programs are difficult to implement in distributed environments because we need some kind of data sharing between processes.
-
Processes can wait for each other, which can very easy lead to deadlocks. This non local property cannot be solved by one of the communicating processes because none of them understands in what kind of environment they're put to use.
-
Concurrency problems are difficult to debug because they are difficult to repeat.
-
Priority systems in multi threaded environments are troublesome, because the priority is most of the time not linked to the functionality which is being served.
-
Priority inversion.
Event Based Models
Summarized: components have their own code/data space. Components communicate by means of sending messages (events) to each other. Components can only handle messages, they cannot wait for each other.
Advantages:
-
Are easy implemented in distributed environments, because an 'event' can be send over to the other partner. (It is useless to wait for components over the network. Instead we can start handling other things.)
-
Since we cannot wait for another component to do something we need to change the way we program. We now have to think asynchronous instead of synchronous.
-
Larger components are definitely easier and more natural to write because more time goes into the logic of the component, not into the interaction between components.
-
Makes it easier to debug an application because we can use a record/replay component system which can repeat a sequence of events without too much problems.
-
Avoids polling loops and badly written code. Everything is interrupt driven and as such only acts when needed.
-
If we specify constraints upon events we can do runtime constraint checking upon the sequence of messages.
-
We can use a very fine grained priority system which is closely linked to the functionality being served.
-
No priority inversion !
-
If we specifiy the correct constraints we can deduce what has to happen before a certain action is executed. (component A is waiting for component B and component C before it will do action a). This kind of backward chaining is very difficult to write down in event based methods.
Disadvantages
-
The programmer need to think about how to write their components and very small components are wonderfully hard to write.
-
Without an extra burden upon the programmer the system can understand what a component is waiting for. This extra semantic information is very useful.
-
The size of the code becomes 4 time larger for small components. Altough a drawback, this problem dissolves if we start writing bigger components.
-
We can never wait for another component to change its state.
-
To avoid data sharing between components we have to copy events from one component to another. This logic can be slow.2
-
Slower than thread based methods.
-
Events doesn't solve the standard concurrency problems as one might tend to conclude.
As can be seen, both methods have there advantages and disadvantages. We choose the event based method because
-
The system will become distributed
-
Event based methods adds semantic information
-
Are easy implemented in single thread environments (some small scaled embedded systems for example)
Writing Components
This section documents the current version of the component system. Since the component system is in continuous development, changes are to be expected. Nevertheless, this documentation gives a good insight view how components should be written and why the design is as it is. Throughout this manual we will built a small application.
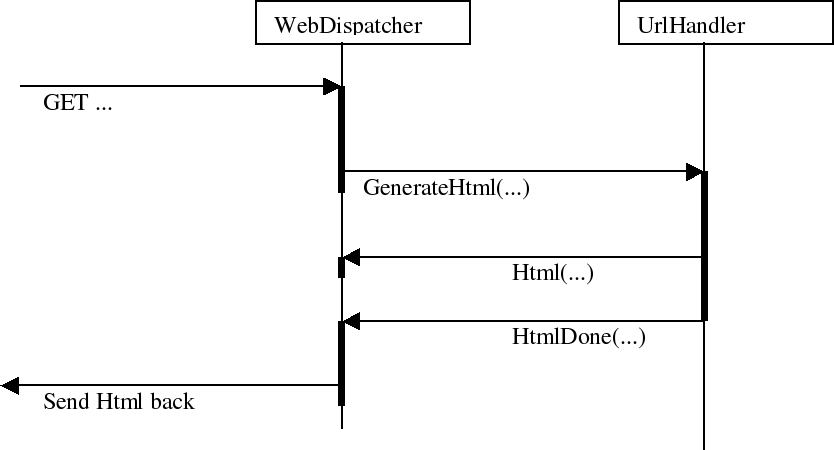
The application will be a webserver component which communicates with other components acting as .cgi scripts, answering to certain urls. These components are called UrlHandlers. The webserver itself is called a WebDispatcher which dispatches incoming 'GET' requests to the correct UrlHandler components. These in turn will answer with a generated webpage.
A component is a reactive entity which uses its own code and data space. Components should only send messages to each other to change each others state. Components run concurrent, but all actions in a component are accessed by only one thread.3
Components can be written in two ways. Either we write them ourselves in java, immediately calling the runtime component system, or we use a precompiler which translates .component files to .java files. We strongly suggest to use the .component file format, because it allows us to change the internals of the component system without endangering all written code. Nevertheless, the current component file format is not yet finished, so beware. To translate a .component file into a .java file we use the component parser, called Transformer, as follows4:
java
component.parser.Transformer <filename>
eg: java component.parser.Transformer Httpd
The filename is mentioned without the .component extention. Currently the precompiler outputs barely readable java code, but this is not really an issue. Worse is that the precompiler sometimes is unable to expand a piece of the grammar which ends up with a fault:
--Err: > expression
<
--Err: please send this message to
--Err: werner.van.belle@vub.ac.be
This error should be reported immediately to werner.van.belle@vub.ac.be. This means that you are using a certain kind of expression in the .component file which is not yet supported. For example, if we try to use a goto statement, the precompiler will break.
The following sections contains a step by step guide how we can write these UrlHandler/WebDispatcher components.
Naming Components
Every component blueprint has to be named uniquely. This simplifies its reference (if, for example, the component blueprint is stored in a catalog). It should also be possible to have multiple versions of a component blueprint. Therefore the identification of a component blueprint consists of an identification name and a version number.5 When component instances are instantiated from the same component blueprint, they also have to be distinguishable by means of a unique name. This name should be used to refer to the component instance.6
Component blueprints are named according to the Java naming conventions where the name clearly states the purpose of the component. This name is always capitalized at the beginning of the identifier (as if it were a java class). Furthermore the identifier has a capital at each start of an English word. Component instances have also a human readable name, stating clearly the purpose of the instance. Abbreviations are capitalized at the first letter. All other letters of the abbreviation should be lower case.7 Underscores and other strange characters are normally not allowed unless used internally in a single component.
Example of component names:
WebDispatcher OK
HttpDaemon OK
HtmlSender OK
SendHtml OK
WEBDispatcher NOT OK
webDispatcher NOT OK
Webdispatcher NOT OK
HTTPDaemon NOT OK
Httpdaemon NOT OK
HTMLSender NOT OK
htmlSender NOT OK
Instance names given to components are used to refer to them and send messages to them at runtime. The name should be chosen in such a way that it defines the use of this instance in the system.
Define it as a Component: The componentclass keyword
A component is not equal to a java class. A component is represented by an instance of a java class, nevertheless the component can use other classes to help it to perform the tasks it is constructed for.
A components variables and other structures to which it relates are owned by the component and should be considered as such. For example, if a component has a reference to a linked list somehow, this linked list is 'owned' by the component and only by that component. As such, we obtain a set of code/data islands at runtime which interact with each other at runtime via the component system. We have two ways to declare something to be a component.
Using the Runtime
At runtime a component is represented as a java class which directly (or indirectly) inherits from the Component class which is available in the component.system package.8The component base class provides some basic functionality such as sending messages, handling messages, initializing, retrieving the components name, assigning message handlers and so on. Bottom-line is that if we want to write a component the easiest way is to extend from Component.
Example: if we want to write an AccessCounter UrlHandler:
public class
AccessCounter extends Component
{
private int counter;
...
}
Components may be constructed by inheriting from each other to add functionality to the other component, as long as we don't have any unanticipated code/data sharing via static variables. 9 For example, there are a number of standard glue components provided which offer you a certain functionality which you do not want to implement every time you write a component. The SubscriberDispatcher glue component is a good example. This component understands subscribe request and is able to dispatch a message to other components, depending on the subscribed components.
public class Httpd
extends SubscriberDispatcher
{...
}
Using the Precompiler
The precompiler offers a special brand new syntax to declare a component. This is done by using the keyword componentclass. This keywords behaves as the class keyword except that some extra intermediate code will be inserted in the class. For example, instead of writing 'public class <x> extends Component', we can write:
componentclass
AccessCounter
{
private int counter;
...
}
We advice using the componentclass keyword because it allows us some flexibility in generating code. For example: It is currently rather difficult to make a standard java class (lets say Frame) behave as a component. The trick we use around the impossibility to inherit from Component is using a bridge variable to some component-representant. If you use the componentclass keyword this code might be automatically generated in the near future !
Handling Incoming Messages: The message keyword
When creating a component system, the ComponentSystem will send an Init message to our UrlHandler after creating the component. If we want to respond to this message we have to implement its behavior somewhere. We do this by writing a public synchronized argument-free, void-returning method (message thunk for short) in the AccessCounter class. All messages which arrive for a component are automatically translated into method calls in the Java class.
Notice that the naming convention for messages is the same as for Java method names, except for the fact that component messages starts with a capital.
A component message never has any parameters declared in its signature. For more information on how to pass information to and from a thunk see the paragraph on Passing/Retrieving Parameters.
Using The Runtime
public class
AccessCounter extends Component
{
private int counter;
public synchronized void Init()
{
counter = 0;
}
}
Using The Precompiler
The precompiler offers a special keyword: message. This keyword automatically expands to public synchronized void.
componentclass
AccessCounter
{
private int counter;
message Init()
{
counter = 0;
}
}
Sending Messages to Components: ..
The AccessCounter should be able to respond to GenerateHtml messages. It should do this by sending a webpage to the WebDispatcher. When all HTML parts have been sent, the accesscounter should send a HtmlDone message. Let's have a look at how we can send this last message.
Using the Precompiler
If we have stored the name of the component in a webserver variable, we
can send the HtmlDone message to the webserver by using the special ..
notation. .. means 'send the message (after the ..) to the component
(before the ..)'.
componentclass
AccessCounter
{
private int counter;
private static final String webserver="WebDispatcher"
message Init()
{
counter = 0;
}
message GenerateHtml()
{
webserver..HtmlDone();
}
}
If we want to specify the WebDispatcher literally10, we can write
"WebDispatcher"..HtmlDone();
If we need to calculate the name of the component (using retrieveWebDispatchersName) before we send a message to it we can write
retrieveWebDispatchersName()..HtmlDone()
The reason why we are using a .. notation is to make the difference between synchronized sends between objects and asynchronous sends to components.
Using the runtime
If we want to send message to the WebDispatcher using the component system runtime without going through the precompiler, we can use the sendMessage method (defined in the component base class).
sendMessage(webserver,"HtmlDone");
sendMessage("WebDispatcher","HtmlDone");
sendMessage(retrieveWebDispatchersName(),"HtmlDone");
Passing/Retrieving Parameters: <>, <|>, <:>
The parameter passing/retrieving mechanism is of a strange kind. We do not rely on the java standard parameter passing mechanism since it is too strict. The standard parameter passing mechanism makes it very difficult for us to write glue components and to transform messages which are being send between components.
The current mechanism works incrementally. Before sending a message to another program (By using the .. notation or the sendMessage call) we create a set of parameters, step by step. We do this by adding fields to an 'outgoing message' record. At the moment we actually has sent the message this set of parameters is cleared and we can start creating a new set of parameters.
To retrieve the parameters we also work with a special 'incoming message', from which we can retrieve certain fields by asking for them. We will now illustrate this in our accessCounter. The WebDispatcher expects a Html message before a HtmlDone arrives. This Html message should contain a Data field which contains a String with the HTML data in it.11
Using the Precompiler
<x> retrieve parameter x
<y|x> retrieve parameter x and typecast it to y
<x:y> putting a parameter x with value y
Example:
componentclass
AccessCounter
{
private int counter;
private static final String webserver="WebDispatcher"
public void Init()
{
counter = 0;
}
public void GenerateHtml()
{
<Data:"You
have accessed page" + <String|Url>>
webserver..Html();
"WebDispatcher"..Html(<Data:",
"+ (counter++) +"times">);
<Return>..HtmlDone();
}
}
This example illustrates some possible uses of this mechanism.
-
The first line (GenerateHtml:1) puts a field in the outgoing message, which will be send at the moment Html is send (GenerateHtml:2). This field is called 'Data' and contains the string "You have accessed page ", with the name of the Url appended to it. The Url is retrieved using a <String|Url> syntax. This means that the Url is retrieved as an object and casted to a String.12
-
The third line (GenerateHtml:3) illustrates how we nevertheless can place this in the asynchronous send. This line creates a field called 'Data' which contains the number of times the page has been accessed. We see how a side-effect in putting a parameter is only executed once. (which is what we would expect of course)
-
The fourth line (GenerateHtml:4) illustrates how we can use the field lookup as an argument. Here we use the knowledge that the only one who will ask us to generate HTML might be interested in the answer. As such we return the messages to our caller, which is stored in the 'Return' field.13
Below is another example of the getters and setters.
public void
Update() throws Exception
{
Socket c = (Socket)<Socket>;
InputStream is=c.getInputStream();
String URL;
BufferedReader dis=new BufferedReader(new
InputStreamReader(is));
URL=dis.readLine();
if ((URL != null) &&
(URL.substring(0,3).equals("GET")))
{
URL=URL.substring(4);
URL=URL.substring(0,URL.indexOf('
'));
dispatchTo(URL)..GenerateHtml(<Url:URL>);
}
else c.close();
}
This example is called from an interrupt handling component. The socketInterruptHandler will send Update to the WebDispatcher at the moment there is a new incoming connection. This piece of pseudo code is what could happen when somebody connects to our WebDispatcher.
Using the runtime
If we want to use the runtime immediately we can use the getField and putField method calls. These methods are made available in the component base class.
getField(name)
returns an Object. Name should be a String.
putField(name,value)
with name to be a String and value to be an Object.
The putField methods must be invoked before invoking the sendMessage method. The order of the putField commands doesn't have any effect.
Session Parameters: ><, >|<, >:<
Now, if we remember the Update method of the Httpd-Component and we think very careful about the implementation of the Html and HtmlDone messages we may encounter a small problem. We need to pass the socket which we received in the Update message to the Html message which will be received in response of the GenerateHtml message. We could do this by adding a Socket datafield to the GenerateHtml message and requiring that everybody who actually generates HTML passes this field back to ourselves. This works, but has a number of major drawbacks:
-
We have to change all components which will ever connect to our Httpd-Component whenever we change the interface.
-
We don't have data hiding anymore, if a certain UrlHandler decides it wants to write immediately to the socket, we're screwed.
-
We actually don't need to pass these socket fields, we can keep them local in the Httpd component and retrieve them when we retrieve a message back from a UrlHandler. 14
To support this we have created a special field (with special field notation), called the 'Hidden Fields'. A hidden field is a field which can be passed to another component. If this other component, in handling the message, decides to sent a message to somebody else, this hidden field is implicitly copied in the outgoing message.
Using the Precompiler
If we use the precompiler, these fields are annotated with reversed brackets. We use >< instead of <>, we use >:< instead of <:>, and we use >|<, instead of <|>. All the fieldnames we choose are automatically prefixed with the name of the component. This is to avoid nameconflicts.
>x< retrieve hidden parameter x
>y|x< retrieve hidden parameter x and typecast it to y
>x:y< put hidden parameter x with value y
Example: The example below illustrates how we could use this to make the Httpd-Component work, without having to change the UrlHandlers interface.
public class Httpd
extends SubscriberDispatcher
{
public void Html() throws Exception
{
>BufferedWriter|Dos<.write(<String|Data>,0,<String|Data>.length());
}
public void HtmlDone() throws Exception
{
BufferedWriter dos = >BufferedWriter|Dos<;
dos.flush();
dos.close();
>Socket|Socket<.close();
}
public void Update() throws Exception
{
Socket c = (Socket)<Socket>;
InputStream is=c.getInputStream();
String URL;
BufferedReader dis=new BufferedReader(new
InputStreamReader(is));
URL=dis.readLine();
if ((URL != null) &&
(URL.substring(0,3).equals("GET")))
{
URL=URL.substring(4);
URL=URL.substring(0,URL.indexOf('
'));
OutputStream
os=c.getOutputStream();
BufferedWriter dos=new
BufferedWriter(new OutputStreamWriter(os));
dos.write("\n");
dispatchTo(URL)..GenerateHtml(
<Url:URL>,
>Dos:dos<,
>Os:c.getOutputStream()<,
>Socket:c<);
}
else c.close();
}
}
Using the runtime
getHiddenField(name)
Retrieve hidden parameter with name name.
Returns an Object
Name should be a String.
putHiddenField(name,value)
Put hidden parameter name with value value
Name should be a String
Value should be an Object.
Creation/Initialization
Creating and initializing components is a rather troublesome task at the moment (we know), but this will change in the near future. Currently components are initialized by calling the createComponent method upon the component system. This method takes two parameters. The first one is the name of the class representing the component (fully qualified), the second argument is the runtime instance name of the instantiated component. For example:
createComponent("httpd.Httpd","HttpdDaemon");
createComponent("httpd.AccessCounter","Kul");
createComponent("httpd.AccessCounter","Rug");
createComponent("httpd.AccessCounter","Vub");
createComponent("httpd.AccessCounter","Luc");
createComponent("httpd.HtmlSender","HtmlSender");
createComponent("conduit.ConduitRunner","ConduitRunner");
This method will create a component (using the single-String-parameter constructor of the class) and send an Init message to the component. So if we want to initialize a component, we should do this in the Init method, not in the constructor. Using the constructor is a bad way to initialize a component because it is too Java specific.
Nevertheless, this simple creation/initialization scheme has some drawbacks.
-
First of all, we have to use fully qualified classnames instead of component blueprint names.
-
Second, we are unable to initialize a component and pass parameters to its initializations. (Which makes initializing these things rather troublesome)15
-
Third, this runtime call is not represented in the special component syntax which makes it difficult for us to change its implementation (so beware :-)
Advanced Message Handling: Active/Reactive/Passive
A question which arrives from time to time is whether components can have their own thread, whether they are active, passive or how they position themselves in a multi threaded environment. The answer is simple.
Components are defined as active entities which have their own thread of execution: well, components should be designed this way, handling incoming messages as needed. This doesn't imply that they should have an execution loop waiting for messages.16
In fact, components are completely passive entities that do not have their own thread. Whenever a message arrives for a component the component system will call the component's handleMessage in a thread owned by the component system. This thread should be given back to the component system as soon as possible (after handling the message). A component should never wait in a message which is being handled. Defined as such, components are passive.
On the other hand, components should be designed as 'active', so what will it be. We propose to use the term 'Reactive', because they react on incoming messages and go to sleep afterwards.
Interrupt handling: The active keyword
This arises the question how we can make real active components which have their own thread of execution. This is not necessary. The only reason why we would want to have a thread is to program in a synchronous way, which is the thing we do not want to do here, or to wait for some event to happen.
The latter case is in fact a sort of interrupt handling, but doesn't require full thread support. Because this is a thing which is always very environment specific and because these kind of interrupt handlers require a very specific timing behavior it is necessary to integrate them tightly into the component system.
In fact, making the bridge between the synchronous nature of some external influences and the asynchronous nature of the component system is part of the component system. Alas, we cannot provide every possible interrupt handler needed and as such we offer a way to declare a message to be active. The active modifier keyword (a modifier is a keyword like abstract, public, final, protected and others) says that a certain thunk can be called from somewhere else, without knowledge of the component system.17
Below are two examples of already written interrupt handlers. The first is a SocketInterruptHandler which listens on port 8080 to accept incoming connections. The second one is a TimingInterruptHandler which sends a notify every <x> milliseconds.
SocketInterruptHandler
public class
SocketInterruptHandler extends
Observable
implements Runnable
{
message Init()
{
new Thread(this).start();
}
active message run()
{
Socket c;
try
{
ServerSocket s = new
ServerSocket(8080);
while(true)
{
c=s.accept();
notify("Socket",c);
}
}
catch(Exception e)
{
ComponentSystem.Fatal("Socket
error ???",e);
};
}
}
This code illustrates how to use a Java thread to wait for a certain condition to happen. (for a certain interrupt if you want). Whenever the interrupt arises we notify all subscribed components by calling notify.
TimingInterruptHandler
We have seen how we can write a threaded InterruptHandler which uses a thread to wait for a certain condition to happen. This is, however, sometimes not needed, and we can use Java supported interrupts to make an InterruptHandler.
componentclass
TimerInterruptHandler
{
message Set()
{
Timer t=new Timer();
t.scheduleAtFixedRate(
new TimerHandler(this),
0, <Long|Rate>.longValue()>);
}
active message tick()
{
notify("TimerTick","");
}
};
class TimerHandler extends TimerTask
{
private TimerInterruptHandler ti;
public TimerHandler(TimerInterruptHandler ti)
{
this.ti=ti;
}
public void run()
{
ti.tick();
}
}
Advanced Message Passing
This section contains some 'advance' topics in the sense that they are pushing the use of the component system to its limit, or they contain some unexpected behavior of the component system which should be taken into account.
Predefined Fields
The component system passes parameters as fields in a Message object. This message record also contains some predefined fields which shouldn't be used because they are used by the component system. Nevertheless, they can be read and changed as needed, since this allows the easy creation of glue components. These fields are described below:
Return
the name of the sending component.
type = String
Invoke
the name of the method to invoke upon the receiving component
type = String
Target
the name of the component which should receive the message.
type = String
Message Delivery Order
Another important issue when working in an asynchronous fashion is the order of delivery of messages. The current requirements for any scheduler plugged into the component system are as follows:
The sequence of the messages sent from one component to another will be kept. All other sequence (between other components for example) is non deterministic.18
We will now illustrate this using a simple example:
A.Test() -> B.A1() + C.A2() + B.A3()19
C.A2() -> B.A2()
The possible arrival sequences of messages at component B are the following ones (no more no less)20
A1 + A2 + A3
This is the expected behavior, and is possible.
A1 + A3 + A2
This is also possible because component C sends a message (A2) and component A sends a message (A3), both components are concurring to send a message, so one of them will have priority. Thus, it is possible that A3 arrives at component B, before A2 arrives.
A2 + A1 + A3
This very unexpected, very scheduler dependent behavior, should be taken into account. It is possible that the scheduler has to choose whether to execute message B.A1() or C.A2(), because it is only running one thread. If it chooses to run C.A2() because of fairness and afterwards has to choose whether to run B.A1() or B.A2() it still can decide to first run B.A2(), also because of some weird definition of fairness :-)
A2 + A3 + A1; A3 + A2 + A1 and A3 + A1 + A2 are incorrect because A3 arrives before A1.
Race Conditions/ Deadlocks
Another big problem of the component system are race conditions. The component system tries to make parallelism and concurrency as transparent as possible to the component programmer. This implies that he might think everything is peachy when writing components and passing parameters. Of course, this isn't. Components are always accessed by one thread at a time. Components should not have their own thread (to avoid timing problems, priority problems in the scheduler and concurrency problems upon the components state).
Nevertheless there is an unavoidable concurrency in the objects which are shared between different components. Normally there shouldn't be any of these objects, but in practice this will happen immeditaly at the moment you send a message from one component to another. Leading to unexpected behavior of the program.
For example, suppose we pass a big database object from one component in a message to another component. Now both components can access the database object concurrently. The database probably doesn't know this, and both components will think they have unique access to the database, leading to race-conditions, or deadlocks.
The problem in this example is the fact that we allow both components to change the database. This should never be allowed. Passed messages should be treated as read-only and should be copied in a perfect world. This rule is enhanced by the fact that whenever we work in a distributed environment we will need to copy the data from one processor to another and writes upon it will be completely impossible.
Currently, we are thinking to add the notion of ownership to the component system. An event/object is owned by only one component. All other components which can access this object can only read it, NOT modify it.
Example: Http Daemon
This is the complete example we showed in fragments throughout the manual. The HttpDaemon example consists of a number of components. We have the Httpd-Component (the main component if you want), the AccessCounter-Component, the Clock-Component and the HtmlSender-Component. Furthermore we have the interrupt handling component, SocketInterruptHandler.
Httpd
This example should be looked at very careful, because it illustrates the use of the hidden parameters. We see how some hidden fields (a buffered writer, called 'Dos' and a socket, called 'Socket') are passed to the UrlHandler. When the UrlHandler sends a message back to this instance of Httpd we will now what socket and what buffered writer we were using.
public class Httpd
extends SubscriberDispatcher
{
public void Image() throws Exception
{
JPEGImageEncoder encoder;
encoder=JPEGCodec.createJPEGEncoder(>OutputStream|Os<);
encoder.encode(<BufferedImage|Image>);
}
public void Html() throws Exception
{
>BufferedWriter|Dos<.write(
<String|Data>,0,<String|Data>.length());
}
public void HtmlDone() throws Exception
{
BufferedWriter dos = >BufferedWriter|Dos<;
dos.flush();
dos.close();
>Socket|Socket<.close();
}
public void Update() throws Exception
{
Socket c = (Socket)<Socket>;
InputStream is=c.getInputStream();
BufferedReader dis=new BufferedReader(new
InputStreamReader(is));
String URL=dis.readLine();
if ((URL != null) &&
(URL.substring(0,3).equals("GET")))
{
URL=URL.substring(4);
URL=URL.substring(0,URL.indexOf('
'));
OutputStream
os=c.getOutputStream();
BufferedWriter dos=new
BufferedWriter(new OutputStreamWriter(os));
dos.write("\n");
dispatchTo(URL)..GenerateHtml(
<Url:URL>, >Dos:dos<,
>Os:c.getOutputStream()<,
>Socket:c<);
}
else c.close();
}
}
Clock
This is probably the most simple example of an UrlHandler. This very small piece of code is a component which only responds to GenerateHtml. This example shows how to declare something as a component. How to handle messages and how to send back a message.
componentclass Clock
{
message GenerateHtml()
{<Return>..Html(<Data:new Date().toString()>);
<Return>..HtmlDone();}
}
AccessCounter
This component illustrates the Init method very clear. The init method is send by the component system, immediately after creating the component.
componentclass
AccessCounter
{
private int counter;
message GenerateHtml()
{
counter++;
<Return>..Html(<Data: new
String("<HTML><BODY>Deze
pagina is "+counter
+" maal opgevraagd</BODY></HTML>")>);
<Return>..HtmlDone();
}
message Init()
{counter = 0;}
}
HtmlSender
This example illustrates how messages are constructed. In this case, we first construate the 'Data' field for the 'Html' messagge. If this is done, we actually send the message.
public class
HtmlSender extends Component
{
static final String fileNotFoundHTML = "Not Found";
static final String noAccessHTML = "No Access";
public void GenerateHtml() throws Exception
{
try
{
String buffer = new String();
BufferedReader fin = new
BufferedReader(new FileReader(<URL>));
try
{
String line = "";
do {buffer += line;
line =
fin.readLine();} while (line != null);
<Data:
buffer>;
}
catch (IOException ioException)
{
<Data:noAccessHTML>;
}
}
catch (FileNotFoundException e)
{
<Data:fileNotFoundHTML+homePath+<URL>+"</BODY></HTML>">;
}
<Return>..Html();
<Return>..HtmlDone();
}
}
HttpdMain
Currently the component system doesn't offer a good main component. This is due to a lack of time. Nevertheless, below is an example how we get this thing to work at the moment.
public class
HttpdMain
{
private static Message msg=new Message();
protected static void createComponent(String welke, String name)
{
try
{
ComponentSystem.createComponent(welke,name);
}
catch (Exception e)
{
ComponentSystem.Fatal("Creation
Error"+name,e);
}
}
protected static Object putField(String nam, Object val)
{
msg.putField(nam,val);
return null;
}
protected static void sendMessage(String target, String invoke)
{
msg.putField("Target",target);
msg.putField("Invoke",invoke);
ComponentSystem.instance().sendMessage(msg);
msg=new Message();
}
protected static void sendMessage(String target, String invoke, Object
d0)
{
sendMessage(target,invoke);
}
protected static void sendMessage(String target, String invoke, Object
d0, Object d1)
{
sendMessage(target,invoke);
}
public static void main(String[] argv)
{
TimingMessageHandler timings=null;
int threadCount=10;
ComponentSystem.init();
if (argv.length >= 1)
threadCount=new
Integer(argv[0]).intValue();
ComponentSystem.acceptScheduler(new
StandardScheduler(threadCount));
ComponentSystem.start();
createComponent("httpd.Httpd","HttpdDaemon");
createComponent("httpd.AccessCounter","Kul");
createComponent("httpd.AccessCounter","Rug");
createComponent("httpd.AccessCounter","Vub");
createComponent("httpd.AccessCounter","Luc");
createComponent("httpd.HtmlSender","HtmlSender");
"HttpdDaemon"..Subscribe(<Selector:"/KUL">,
<DispatchTo:"Kul">);
"HttpdDaemon"..Subscribe(<Selector:"/VUB">,
<DispatchTo:"Vub">);
"HttpdDaemon"..Subscribe(<Selector:"/LUC">,
<DispatchTo:"Luc">);
"HttpdDaemon"..Subscribe(<Selector:"/RUG">,
<DispatchTo:"Rug">);
"HttpdDaemon"..DefaultHandler(<DispatchTo:"HtmlSender">);
createComponent("httpd.SocketInterruptHandler","Socket8080");
"Socket8080"..Subscribe(<Observer:"HttpdDaemon">);
}
}
Standard Glue Components
The glue components provided by the component system should be generic well-designed components with as little as possible overhead towards the global system and which can eventually be removed when compiling. We have made a start by offering some glue components. We know that these are not as flexible as they ought to be, but at least they can form a base of usable/reusable glue components.
The Wait Component
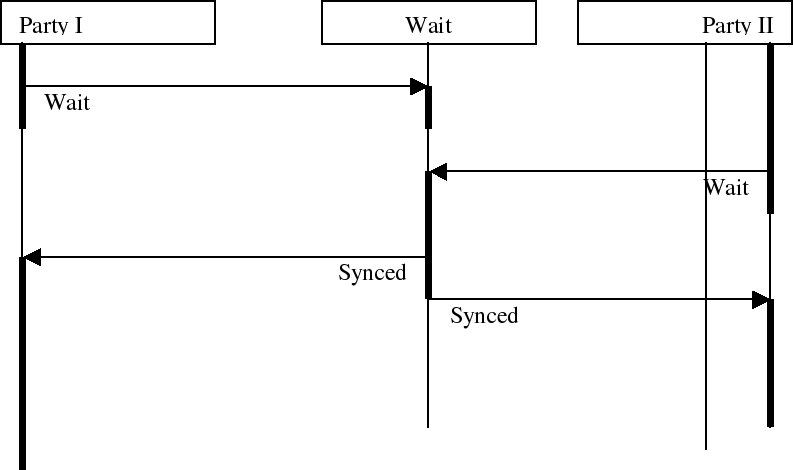
An often asked question is: 'everything is asynchronous, how can we make an execution flow wait for other components ?'. The answer is simple: interrupt driven. By sending an asynchronous message at the moment both (or more) components has achieved a certain point, we can send an interrupt back to the waiting component(s). This of course require a redesign of the software, in the sense that we doesn't wait for other components. Instead we get notified when a certain condition happens. As an illustration a simple wait component is implemented as glue21
public class Wait
extends Component
{
private String inwait=null;
public Wait()
{
}
public void Init()
{
inwait=null;
};
public void Sync()
{
if (inwait==null)
inwait=getReturn();
else
{
if
(inwait.compareTo(getReturn())==0)
ComponentSystem.Fatal("Double
wait");
returnMessage("Synced");
sendMessage(inwait,"Synced");
inwait=null;
}
}
}
At the moment a Sync operation is invoked, we check whether we are already waiting or not. If we are not yet waiting we go to a wait state. If we are already waiting we send a Synced message back to both parties, which can now continue with their logical execution.
Dispatcher Component
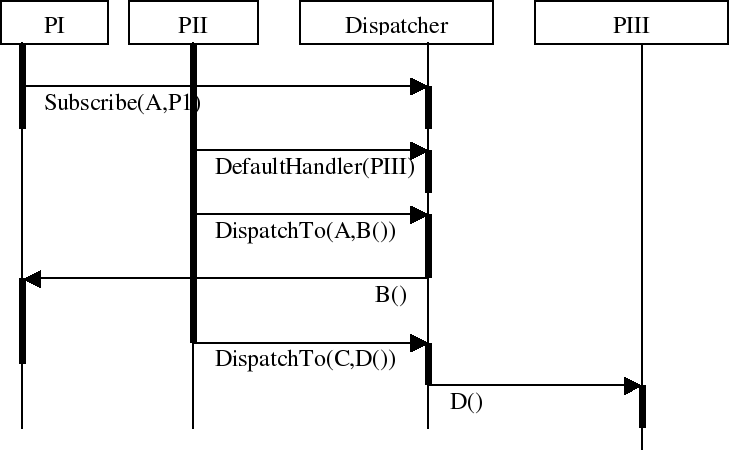
Another standard glue component is the dispatcher component. This component will keep track of other components which subscribe themselves to a certain string. Afterwards we can easily retrieve the name of the component which was subscribed to a string and send a message to it.
public class
SubscriberDispatcher extends
component.system.Component
{
private TreeMap subscribers=new TreeMap();
private String defaultHandler;
public SubscriberDispatcher() {}
public void Subscribe()
{subscribers.put(getField("Selector"),getField("DispatchTo"));}
public void DefaultHandler()
{defaultHandler=(String)getField("DispatchTo");}
public void Unsubscribe()
{subscribers.put(getField("Selector"),null);}
protected String dispatchTo(String selector)
{
String dispatchto=(String)subscribers.get(selector);
if (dispatchto==null) dispatchto=defaultHandler;
return dispatchto;
}
}
Observable
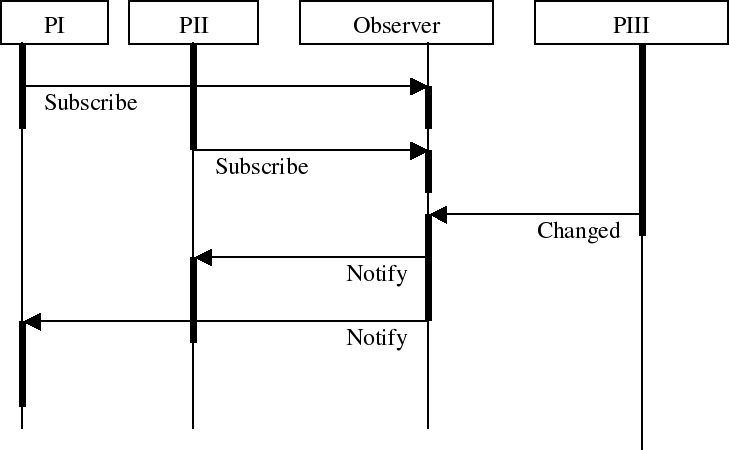
The observable component is a simple implementation of the 'Observer Design Pattern'. The implementation itself requires some fine tuning, which will happen in the future. Below is an MSC and the current code.
public class
Observable extends
component.system.Component
{
private TreeSet observers=new TreeSet();
public Observable()
{
}
public void Subscribe()
{
String observer=<String|Observer>;
observers.add(observer);
}
protected void notify(String name, Object value)
{
Iterator it = observers.iterator();
while (it.hasNext())
{
String observer =
(String)it.next();
putField(name,value);
observer..Update();
}
}
}
Describing Loops
The component system, designed to be used in embedded systems, should somehow enable the programmer to give some kind of semantic information to the running system in regard to scheduling. This information can be viewed as timing constraints placed upon MSC's, with lowerbounds (what can the embedded system offer us in the best case) and upperbounds (what do we expect the system to do. Of course, describing timing behavior of components and pieces of code is troublesome. This because
-
Most of the time, the code written is untracktable. This means that we cannot predict at compile time how many times a loop will execute.
-
Even if we can predict how much time it takes to handle a message, we still have the problems of loops between components which cannot be described.
It is clear that both of these problems cannot be solved automatically. As such the component system offers some very basic suport. (nevertheless, useful support)
-
The component system forbids thunks with an infinite execution time. As such we can time the behavior of most of the thunks. If we work with a testset which acompagnains a component, we can easily run the component on the target architecture and get some measures for its execution time.
-
The problem of message loops between one, two or more components can be tackled by integrating all these interacting components into one single component with its own testset and timing data.
Currently there are no loop components available, but as the projhect continues these will be necessary.
Using The Component System
Now that we know how we can write components, its time to look at the Component System. The Component System is the runtime environment in which components are executed. This means that the component system takes care of scheduling messages, handling interrupts and distribution. Of course, its almost quite impossible to deliver a component system which is small scaled and does everything you want. This is the reason why most of the behavior of the component system has been made pluggable. For example, we can instantiate a new scheduler and plug it into the component system, or we can add a new message handler to print message traces between components while we are developing the software. At the moment we push it into the embedded system we can choose smaller schedulers or smaller message handlers.
A good example of this is the possibility of using a multi threaded scheduler on a large scaled system and a single threaded scheduler on a small scaled embedded system. The component system allows us to design an application regardless of how many threads will be used when executing. If we run the application on a larger embedded system we may find ourselves using 10 to 20 threads. But if we run the same application of a small scaled system, we may find ourselves using only one thread. In the limit it is even possible to eliminate all uses of threads from the Component System, without endangering the correct execution of the program.
Now, let us have a look at how the component system can be instantiated with different plugins.
Running The Component System
The component system is written in Java, meaning that we always have to write a main program, which instantiates the runtime component system and which boots up a number of standard components. Initializing the component system should be the first thing done in the main loop of the program.
It should be noted that there is only one instantiation of the component system which should be initialized at the start of the program. This should be done by calling the init method on the ComponentSystem class.
ComponentSystem.init();
After we have created the component system we have to assign a scheduler to it, which will be used for the rest of the running time of the application. If you want to use a standardScheduler with <x> number of threads, you can create such a scheduler and pass it to the ComponentSystem.
ComponentSystem.acceptScheduler(new StandardScheduler(<x>));
Now, suppose we also want to add a new message handling strategy, which prints a line for every message handled, we could plug in a TracingMessageHandler.
ComponentSystem.acceptMessageHandlerFactory(new TracingMessageHandler());
Finally, when all plugins have been installed, all we have to do is start the Component System, by calling the start method.
ComponentSystem.start()
When the component system has been started we can start adding some interrupt handlers, so our application becomes reactive to the rest of the world. For example, suppose we have to add a SocketInterruptHandler and a TimingInterruptHandler. We can simply do this by creating these components.
createComponent("httpd.SocketInterruptHandler","Socket8080");
"Socket8080"..Subscribe(<Observer:"HttpdDaemon">);
createComponent("httpd.TimerInterruptHandler","Timer");
"Timer"..Set(<Rate:new Long(5000)>);
"Timer"..Subscribe(<Observer:"ConduitRunner">);
The first two lines create a SocketInterrupthandler, so from now on our application will be able to respond to incoming socket calls. This interrupt handler is from now on known as "Socket8080" and the HttpdDaemon has been subscribed to this interrupt/socket. The last three lines create a TimerInterruptHandler which will send a notification to the "ConduitRunner" every 5000 ms (or 5 s).
Of course before we can subscribe components like ConduitRunners and HttpdDaemons we have to construct them, in exactly the same way. After initializing all the components the static main method should finish. The complete logic of the program should be in components. The main exists only for 'glueing/instantiaton' purposes.
Now that we know how we integrate the component system into our application, let us have a further look at the internals of the system.
Message Flow
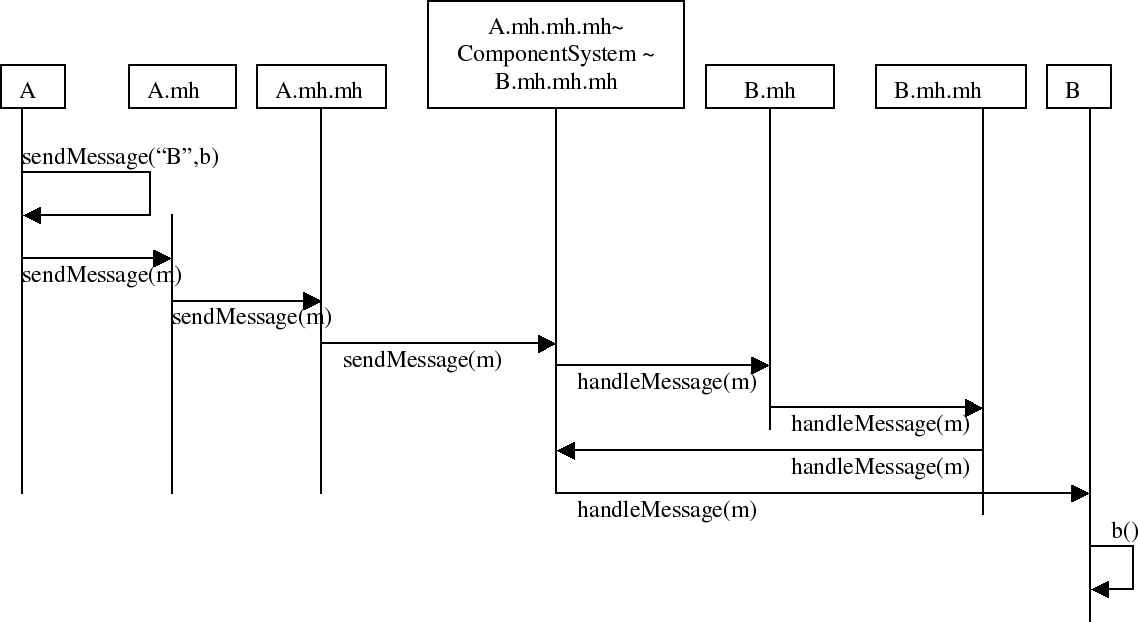
The complete component framework and the interaction between components is message driven. Writing components in a event driven requires sometimes the ability to override the standard message behavior. For example, if we want to glue some components together we definitely don't want to compile stubs every time. On the other hand, the component systems standard message delivery can be inadequate and may require new plugins to deliver messages. For example, if we want to add 'channels' or 'connectors' between components.
This section explains how the standard message delivery works. We do this by showing a message trace from component A, which is executing the message a and sends a message b to component B. The explanation written trace explains what happens if no message handler is installed. The MSC shows what happens if 2 mesagehandlers are installed. The code of the a method in component A looks like:
public void a()
{
"B"..b();
}
-
A.a() will call sendMessage upon itself
-
A.sendMessage() will call the component its MessageHandler
-
A.messageHandler.sendMessage() will be the component system if no special messagehandlers are installed.
-
ComponentSystem.sendMessage() will call the Scheduler to schedule the message.
- -----------
-
Whenever the scheduler decides to execute the message, it will look up the component its messagehandler and call handleMessage.
-
B.messageHandler.handleMessage() will be the component system if no special messagehandlers are installed, so
-
ComponentSystem.handleMessage() will call handleMessage upon the component
-
B.handleMessage() which has a standard behavior of invoking <invoke> upon itself will call
- B.b()
The
MSC below is the same trace from executing the sendmessage to receiving
the message at component B if two messagehandlers are installed.
Message Handlers
Now, if we want to write our own message handlers we encounter a number of odd issues at first sight. For example, do we want that all components have the same message handler or should we be able to differentiate on this. It would be nice to write a debugging message handler which keeps track of all messages send from component "A", "B" and "C", but not from the other components. If would be very nice if we were able to write a message handler factory which created the right message handler for the right component. Luckily this is possible.
Whenever we plug in a new Message Handler into the component system, we actually put in a new messageHandlerFactory, which in its turn will or will not create a new MessageHandler object for every component instantiated.
MessageHandler factories can be stacked so we can create a number of independent message handlers for every component instantiated. The interface for the MessageHandler Factory looks as follows:
public interface
MessageHandlerFactory
{MessageHandler createMessageHandler(
MessageHandler nxtHandler,
String componentname);}
All a messagehandler factory has to do is to create a messageHandler for the component with name <componentname>. The freshly created MessageHandler should receive <nxtHandler> as its message handler.
Now, this raises the question what a Message Handler should do:
public interface
MessageHandler {
public void handleMessage(Message m) throws Exception;
public void sendMessage(Message m);}
The handleMessage method should do whatever the message handler wants to do with the message and afterwards deliver it to its own messagehandler (which he should normally know, when creating the message handler a <nxthandler> field is passed, which can be stored, or ignored). The sendMessage method can also plug in some debugging code, but should also send the message to its own messageHandler.
This message handling system may look complicated, but this is only when creating components. Once created, we have a direct chain of message handlers which call each other, without unnecessary messagehandlers stored in between. In practice, message handlers are not too hard to write. Below are three examples. The first example is the standard message handler (the Component System itself), the second example shows how we can print a trace of messages and the third one shows how we can time message traces.
The Standard Message Handler
Below is the code of the standard Message Handler. The standard Message Handler (which is the Component System) is the endpoint of messages which are being send and is also the endpoint of messages which should arrive.
public void
handleMessage(Message m) throws
Exception
{
m.getTarget().handleMessage(m);
}
public void sendMessage(Message m)
{
scheduler.scheduleForExecution(m);
}
When sendMessage is called we will call the current scheduler and schedule the message for execution. From now on it's the schedulers task to resurrect this message and deliver it by calling handleMessage upon the component's messageHandler. Whenever handleMessage is called, we will retrieve the destination of the message (getTarget()) and ask the target (the actual component, not its messagehandler) to handle the message.
The Tracing Message Handler
Below is the first illustration how we can write a messagehandler which intercepts outgoing and incoming messages. This messagehandler was designed to print the messages sent by a component when handling a certain message. For example, if a component A, when handling the message a sends messages B.b() en C.c() it will print
A.a() -> B.b() + C.c()
This can be simply achieved by keeping track of which message is being handled by a certain component and keeping track of all the messages sent out by that component while handling that message. When the component returns from its messagehandling we print out the complete sequence. 22
So... handleMessage and sendMessage look like:
public void
handleMessage(Message m) throws
Exception
{
Component target=m.getTarget();
currentRule=target.getName()+"."+m.getField("Invoke")+" -> ";
messageHandler.handleMessage(m);
System.out.println(currentRule);
}
public void sendMessage(Message m)
{
if (currentRule!=null)
currentRule+=m.getField("Target")+"."+m.getField("Invoke")+" ";
messageHandler.sendMessage(m);
}
HandleMessage:1 retrieves the target of the message. (the component we want to reach). handleMessage:2 starts creating a rule which looks like "<targetname>.<targetinvocation> ->". This rule will be expanded further by the next line. handleMessage:3 invokes its own messageHandler in which directly or indirectly messages will be send. These messages are caught in sendMessage and appended to the currentRule. Finally, in handleMessage:4 we print out the rule we observed.
SendMessage:1 checks whether the rule is empty. This is needed because sometimes a message can be send from within a component without being a response to another message. This is the case for InterruptHandlers and the ComponentSystem. (the Init message for example). SendMessage:2 expands the rule by appending the send message to the current production. SendMessage:3 calls the next messageHandler to deliver the message.
These two things are quite simple, nevertheless, because we have to keep track of a rule for every component handling a message, we need a separate message handler for every component. Hence, we need to write a messageHandlerFactory which instantiates a TracingMessageHandler.
public class
TracingMessageHandler
implements MessageHandler, MessageHandlerFactory
{
String currentRule=null;
MessageHandler messageHandler=null;
public TracingMessageHandler()
{
System.out.println("Installing Tracing Message
Handlers");
}
public MessageHandler createMessageHandler(MessageHandler nxt, String
name)
{
return new TracingMessageHandler(nxt, name);
}
protected TracingMessageHandler(MessageHandler mh, String name)
{
messageHandler=mh;
System.out.println("Constructed component "+name);
}
}
The tracingMessageHandler provides two functionalities at the same time. First these are the actual MessageHandlers (methods handleMessage, sendMessage; the protected constructor and the fields currentRule and messageHandler), second, it is the MessageHandlerFactory (methods createMessageHandler and the public constructor)
The Timing Message Handler
We wrap up the description of messagehandlers by giving a bigger example of how we can time messagehandling. The way this is done resembles the way the TracingMessageHandler works, except that we put all the timings in one object. Of course, before we can do so we need an abstraction which keeps track of time.
class TimingData
{
public long max=-1,min=-1,time=0,count=0;
public TimingData() {}
public void addTiming(long millis)
{
time+=millis;
count++;
if (min==-1) min=max=millis;
if (millis>max) max=millis;
if (millis<min) min=millis;
}
public double getAvg()
{
return (double)time/(double)count;
}
/* returns [time/count][min/avg/max]*/
public String toString()
{
return "["+time+"/"+count+"]"+
"["+min+","+getAvg()+","+max+"]";
}
}
The Timing MessageHandler itself is fairly obvious to write:
public class
TimingMessageHandler
implements MessageHandler, MessageHandlerFactory
{
private MessageHandler mh;
static TreeMap timings=new TreeMap();
public TimingMessageHandler()
{
System.out.println("Installing Timing Message
Handlers");
}
protected TimingMessageHandler(MessageHandler nxt)
{
mh=nxt;
}
public MessageHandler createMessageHandler(MessageHandler nxt, String
name)
{
return new TimingMessageHandler(nxt);
}
public void handleMessage(Message m) throws Exception
{
long time = System.currentTimeMillis();
mh.handleMessage(m);
time = System.currentTimeMillis() - time;
addTiming(m,time);
}
public void sendMessage(Message m)
{
mh.sendMessage(m);
}
static public void addTiming(Message m, long millis)
{
TimingData td;
String thunk=
(String)m.getField("Target")+"."+
(String)m.getField("Invoke");
if (timings.containsKey(thunk))
td=(TimingData)timings.get(thunk);
else
{
td=new TimingData();
timings.put(thunk,td);
}
td.addTiming(millis);
}
static public void displayTimings()
{
Set entries=timings.entrySet();
Iterator it=entries.iterator();
Map.Entry entry;
while(it.hasNext())
{
entry=(Map.Entry)it.next();
System.out.print(entry.getValue());
System.out.print(" ");
System.out.println(entry.getKey());
}
}
}
Schedulers
Regarding the internals of the component system there are two important things which are pluggable. The first are the messageHandlers (explained in an earlier section). The second is the scheduler which is also pluggable. As said before, the standard message flow of messages between components starts by a component which calls sendMessage. This message is propagated trough a set of messagehandlers and arrives finally at the component system, which will call the scheduler to schedule the message for execution:
scheduler.scheduleForExecution(message);
This
method should return immediately after scheduling the message for
execution. This method should never wait until the message has been
processed.
At a
certain moment in time the scheduler will decide to execute a message.
He can do this by calling the execute method upon the message.
message.execute()
This method will only return when the message has been handled. The execute method will look up the components message handler and call handleMessage upon it. The component system, when started, will call start upon the scheduler. The scheduler start method currently returns the execution, but it is possible/probable this will change in the future. The component system is delivered with two schedulers. One illustrates how we can write a stupid scheduler, which behaves incorrect. The second scheduler is a simple FIFO scheduler which behaves correct. (as described in the section: Advanced Message Passing). We will now illustrate both schedulers since some of its classes may be reusable to implement a faster scheduler.
Scheduler Provisions offered by the Component System
The standard schedulers work with a Queuing system with 1 inQ (messages scheduled for execution) and a number of outQs (One queue with execution loop for every possible thread). The run method decides which message (from the inQ) should be placed on which outQ. The queue serves a a concurrency controlling mechanism (provider consumer). At one end the scheduler puts in the messages, at the consumer end we execute the messages.
The Executionloop is obvious. It pops a message from its associated Q and it continues. If there is no message available the Q will automatically make the execution loop wait.
class ExecutionLoop
extends Thread
{
private MessageQueue mqueue;
public ExecutionLoop(MessageQueue q)
{
mqueue=q;
start();
}
public void run()
{
while(true)
{
Message m=(Message)mqueue.pop();
m.execute();
}
}
}
The MessageQueue controls the concurrency which can be used to implement a synchronous receive at consumer side and an asynchronous send at producer side. In other words: the add is asynchronous and puts a message in the Q, while the pop blocks if there is no message available.
public class
MessageQueue
{
private boolean iswaiting=false;
private Message busywith=null;
private LinkedList ll = new LinkedList();
/**
* returns whether the receiving end of the Q is busy with target.
* The Q asumes the consumer is busy as long as he doesn't wait for
* another message.
*/
public synchronized boolean isBusyWith(String target)
{
String t;
if (busywith==null) return false;
t=(String)busywith.getField("Target");
if (t.compareTo(target)==0) return true;
return false;
}
/**
* Loops over the Q to check whether the Q contains a message
* for target. Doesn't take the busy With into account.
*/
public synchronized boolean containsMessageFor(String target)
{
int s=ll.size(),i;
for(i=0;i<s;i++)
{
Message m=(Message)ll.get(i);
String
t=(String)m.getField("Target");
if (t.compareTo(target)==0)
return true;
}
return false;
}
public synchronized
void push(Message o)
{
ll.addLast(o);
notify();
}
/**
* Blocking pop to retrieve the next message on the Q. If the Q is empty
* this method will block until a message is pushed upon the Q. This
method
* is used to synchronize two threads to each other using a consumer
* producer like approach.
*/
public synchronized Message pop()
{
if (ll.isEmpty())
{
iswaiting=true;
busywith=null;
wait();
iswaiting=false;
}
busywith = (Message)ll.getFirst();
ll.removeFirst();
return busywith;
}
}
StupidScheduler
The stupid scheduler is an illustration of a incorrect scheduler algorithm, which nevertheless looks fine. So beware !
public class
StupidScheduler extends
StandardScheduler
{
public StupidScheduler(int tC)
{
super(tC);
}
public void run()
{
int currentout=0;
while(true)
{
Message m=(Message)inQ.pop();
outQs[currentout++].push(m);
currentout%=threadCount;
}
}
}
When a message is schedule for execution it is placed in the incoming Q. The run method pops a message of the Q and continues and chooses the first outQ to deliver the message to. This looks like a good working scheduler but it violates the semantics of the component system. The component system should implement FIFO channels between components: If component A.a() sends two messages B.b() and B.c() in this order. These messages should be delivered in this order at component B. It is possible that this scheduler violates this constraint. Furthermore it is also possible that a component runs concurrent with itself, which is also not allowed !
StandardScheduler
Below is the standard scheduler used by the component system. This scheduler preserves the fifo semantics between components. This code illustrates how difficult it is to write a correct scheduler. Have a look at the synchronized outQ. This is absolutely necessary because between the check whether the Q is busy with message m and the check whether message m is in the Q can be a change of state of the Q, returning 'false' when he is in fact busy with the message m.
public
class
StandardScheduler extends Thread implements Scheduler
{
/**
* inQ zijn al de berichten die binnengekomen zijn bij het verwerken
* van de huidige thunk (of thunks). Berichten verhuizen automatisch van
* de inQ naar 1 van de outQ's. Een outQ is een Q die een bericht
* klaarzet bij een bepaalde thread. ThreadCount is het aantal threads
* bruikbaar om ComponentMessages af te handelen.
*/
protected static MessageQueue inQ = new MessageQueue();
protected static MessageQueue[] outQs = null;
protected static int threadCount=0;
public
StandardScheduler(int tC)
{
int i;
threadCount=tC;
outQs=new MessageQueue[threadCount];
for(i=0;i<threadCount;i++)
{
outQs[i]=new MessageQueue();
new ExecutionLoop(outQs[i]);
}
}
public void
scheduleForExecution(Message m)
{
inQ.push(m);
}
public void run()
{
int currentout=0, emptyQnr,i;
while(true)
{
Message m=(Message)inQ.pop();
/* zoek de outQ die bezig of
zich bezig gaat houden
* met target */
String
target=(String)m.getField("Target");
for(i=0, emptyQnr=-1;
i<threadCount;i++)
{
synchronized(outQs[i])
{
if (outQs[i].isBusyWith(target)
|| outQs[i].containsMessageFor(target))
{
outQs[i].push(m);
break;
}
if (outQs[i].isEmpty()) emptyQnr=i;
}
}
if (i<threadCount) continue;
/* indien niemand er zich gaat
mee bezig houden of er mee bezig is
* kiezen we iemand die niets te
doen had
*/
if (emptyQnr>=0)
{
outQs[emptyQnr].push(m);
continue;
}
/* als er niemand niets te
doen had pakken we maar iemand
*/
outQs[currentout++].push(m);
if (currentout==threadCount)
currentout=0;
}
}
}
EDF Scheduling and Timing contracts
This section describes a possible scheduler for the component system. The scheduler is priority based and schedules messages based on their absolute deadlines. Messages with early deadlines are executed first, as such it can be classified as an Earliest Deadline First scheduler.
The link to the component composition approach with its contracts is also shown, since it was already stated that contracts would have a runtime meaning. It this appendix we only show Timing Contracts, because they are related to the scheduling of messages.
These Timing Contracts are monitored by Message Handlers. Message handlers see the messages an associated component sends and also the messages it receives.
This section presents two message handlers related to Timing Contracts: a TimingContractRequiringPartyHandler and a TimingContractProvidingPartyHandler. These handlers are responsible for monitoring the Timing Contracts between two components.
Timing Contracts
To schedule messages based on their deadlines extra information is needed. This extra information comes from the Timing Contracts and is issued by using hidden (or extra) parameters.
Suppose one has two components (A and B) connected to each other. Component B offers an operation o() to A. The specification of B specifies that o() will be processed in 20 msec. Suppose now that A agrees with this specification. Since there is an agreement, a contract can be created between both parties. This contract is called a Timing Contract.
Recall that such a Timing Contract consists out of 323 parameters, but for this example we will only look at one possible parameter: maxEndTime. As such, the contract between A en B for operation o() has a maxEndTime of 20 msec. Recall that this maxEndTime is relative to the submission time of the message.
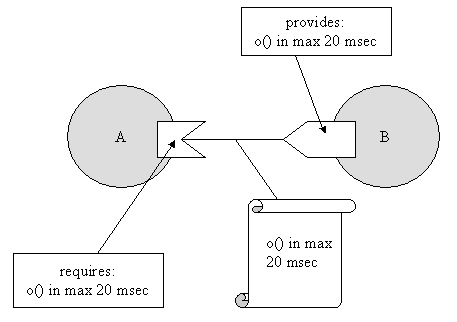
The contract creation has to be performed by the component composition tool. Once the application has been composed, the tool has to generate code for the support of these Timing Contracts. Therefore we use a TimingContractRequiringPartyHandler which is connected to Component A. There is also a TimingContractProvidingPartyHandler which is connected to Component B. Both handlers share one object: an object representing the contract for operation o() between A and B. In this object, the maxEndTime is stored and can be retrieved by both handlers. Since the component A can communicate with different other components, through different ports, it could be possible to have different Timing Contracts. Therefore every TimingContract handler is coupled to one port of the component. As such if component A would be connected to a third component C, also with a Timing Contract, component A will have two TimingContract handlers.
As such, a Timing Contract handler is bound to a port. If there is more than one Timing Contract for this port (ex. the interface of B consists of a second operation p() which also has a timing specification), then the handler is also responsible for managing the contract relating to operation p(). To summarize: there is one TimingContract handler per port, regardless of how much operations are bound to this port. Lets take this last situation as our example:
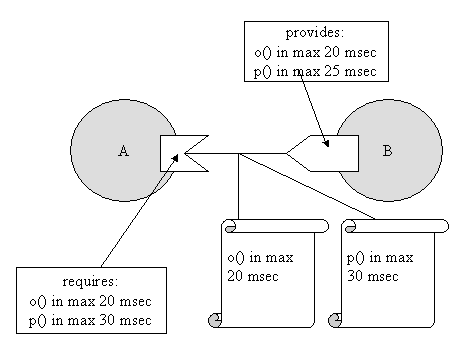
At runtime, component A will have exactly one TimingContractRequiringPartyHandler and B will have exactly one TimingContractProvidingPartyHandler. There will be two Timing Contract objects: one for o() and one for p(). These two handlers reside in the Contract Layer, which is a support layer for the managing and monitoring of contracts. This layer is on top of the component system. See also the next figure.
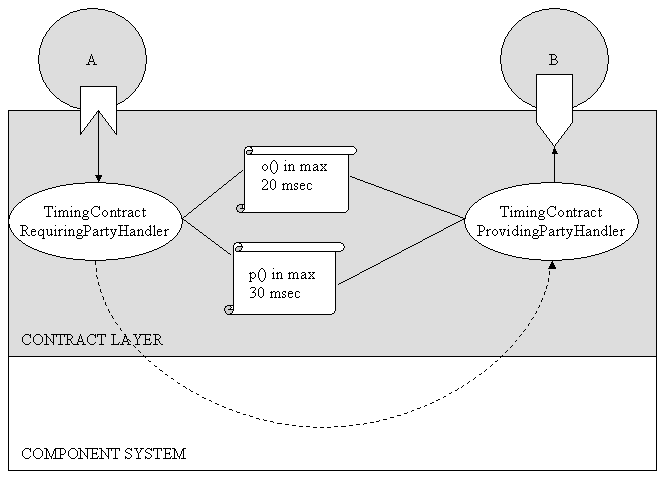
The TimingContractRequiringPartyHandler (abbreviated in the remainder of this document as TCRPH) will intercept messages sent from A to B. These messages will be o() or p() messages. When A sends one of these two messages, TCRPH will look if there is a contract for this message. If this is the case, the maxEndTime of the message will be appended to the message (by adding an extra field “TIMING.MAXENDTIME” to the message) and a value indicating the maximum end time in msec. Another field will also be added: “TIMING.SUBMITTIME”. The value of this field indicates the absolute time at which the message was received by TCRPH. Remark that the value of TIMING.SUBMITTIME added to TIMING.MAXENDTIME equals the absolute deadline of the message24.
There is also the possibility to add another extra field: “TIMING.PRIORITY”, but this is not used by the Timing Contract message handlers.
After that, the message can be send: it is intercepted by the component system that sends it to the scheduler. This scheduler is an EDF scheduler, which sorts messages based on their absolute deadline. It executes the messages with the earliest deadlines first.
Once when the message from A is available for execution, the corresponding operation on B is performed. After termination of the operation, the current time is calculated by the TimingContractProvidingPartyHandler (abbreviated TCPPH). If the current time is greater than the absolute deadline of the message, then the deadline was not reached. TCPPH could send back a notification to TCPRH, but in the current implementation TCPPH only logs this information.
Principles of the scheduler
As explained in the previous section, the scheduler receives messages with two extra fields: TIMING.MAXENDTIME and TIMING.SUBMITTIME. The TIMING.SUBMITTIME specifies at which time the message was posted and the TIMING.MAXENDTIME how long the message is allowed to take before the end of its execution. A third parameter TIMING.PRIORITY is also allowed, but it is not yet used. As such, there is only “one” priority in our current implementation.
The scheduler is a priority-based earliest deadline first scheduler. It is a soft-realtime scheduler that does not take into consideration priority inversion issues.
The number of priorities of the scheduler can be selected when the scheduler is created, but take into consideration that there will be one thread per priority. Every thread will have a different priority, so it makes no sense to declare more priorities than the available thread priorities. A later extension of the scheduler could allow threads of equal priority.
These threads are called PriorityExecutionLoops and their purpose is to execute messages that are posted in their associated EDFMessageQueue. This queue receives messages from the EDFScheduler, which is the “root” class of the scheduler.
When the EDFScheduler receives a message, it first looks at the associated priority. This priority tells in which queue the message has to be put. After that, the EDFMessageQueue is responsible for sorting the message based on its absolute deadline: early deadlines are sorted at the start, late deadlines at the end.
The PriorityExecutionLoop pulls out the message with the earliest deadline, executes it and pulls the next message out of the queue, and so on.
The next figure represents the scheduler with three PriorityExecutionLoops, each with a specific priority. Every PriorityExecutionLoop gets messages from a local EDFMessageQueue. Messages are put in the queue by the EDFScheduler.
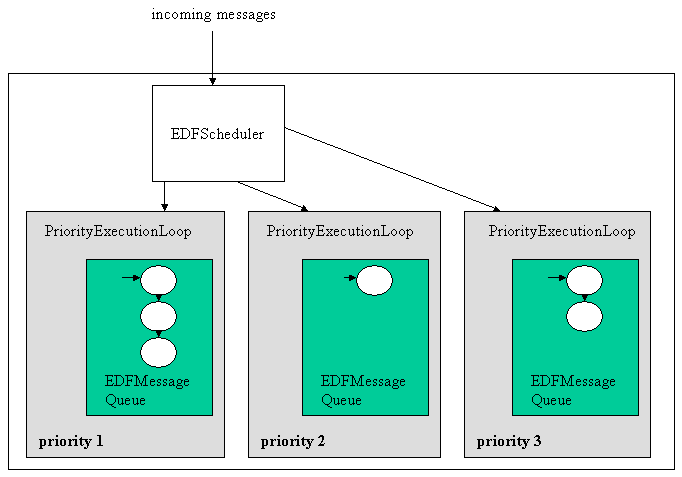
A scenario
Recall the example given earlier in this document: two components A and B are connected to each other. B offers two operations to A: o() in 20 msec and p() in 25 msec. Component A requires the execution of o() in 20 msec and the execution of p() in 30 msec, so two Timing Contracts are made: maxEndTime of o() is 20 msec and maxEndTime of p() is 30 msec.
Since it is possible to plug new schedulers in the component system, we can plug in our own EDFScheduler. Therefore the EDFScheduler has to implement the Scheduler25 interface, which consists out of two methods:
-
public void start(), this methods starts the scheduling service. It can be used to initialize the scheduler (for example: the creation of threads).
-
public void scheduleForExecution(Message m), this method is called by the component system when the scheduler has to schedule an newly arrived message.
Once the EDFScheduler is plugged in, and started, the components A and B can be loaded and initialised. Loading component A and component B also means that their associated message handlers are created. In our case, one TCRPH and one TCPPH will be created. Also, two contract objects will be created: one for o() and one for p(). These contract objects will be attached to the created TCRPH and TCPPH.
Suppose that A wants to send o() and immediately thereafter also wants to send p(). When sending o() the TCRPH annotates the message with TIMING.MAXENDTIME and TIMING.SUBMITTIME and passes the message to the Component System. As a result the Component System calls scheduleForExecution() on the scheduler. The scheduler puts this message in a EDFMessageQueue.
Now A sends p(), and the whole process is repeated. The scheduler will put p() after the message o() in the queue because the deadline of p() is after the deadline of o(). Suppose now that there are two other components C and D. Component C wants to send a message q() to D with a Timing Contract of 10 msec, at the same time26 A sends o() and p(). Then, when C posts the message to the Component System, the scheduler will put this message before o() and p() because its absolute deadline is earlier.
Possible Extensions
This scheduler performs a basic scheduling service based on priorities and deadlines. But there are still some issues that can be investigated:
-
check which data structure is best for the scheduler. Messages have to be put in a queue. If a list is chosen, the insertion of a message could take a while. If an array is chosen, what happens when more messages arrive than the maximum length of the array? And how can a message be inserted in an array if there is no room between two cells? Currently a list is used. We are also developing an EDFScheduler that uses a combination of an array and a list. The array is used for early deadlines, the list is used for late deadlines.
-
reservation mechanism. The EDFScheduler only offers a best-effort service. An extension would be the addition of a reservation mechanism: this would enable the reservation of some “time slots” for a component. It would then be easier to guarantee a specific execution time.
-
poor time resolution of the JVM (and underlying system). a standard JVM on a Windows PC has a resolution of 10 msec. This means that when a component A sends a message on time t, then waits for 5 msec and then sends another message on time t + 5, the component system could still see both messages as being sent at the same time. This is due to the hardware/OS dependent precision of the java call System.currentTimeMillis()27.
-
priority inversion. If the scheduler uses threads with different priorities it could be possible for a lower priority thread to block a higher priority thread due to the locking of system resources or objects. Priority inversion however will only occur frequently if two components use extensively the same data structure, which could indicate a design flaw.
-
call semantics of the component system. Recall the semantics of the component system: when two components A and B directly send a message o() followed by a message p(), these message have to arrive in order. A mechanism for supporting this is not explicitly built into the scheduler, since p() can only be executed before o() if the maxEndTime in the Timing Contract associated with p() is less than the maxEndTime in the Timing Contract associated with o(). But this is a design error: one cannot suppose o() to be executed before p() if the deadline of p() is before the deadline of o()!
However, if an explicit checking is needed, this should be included in a Synchronization message handler. This message handler has to control the correct arrival of messages. If one message is out of order, this one has to be cached until the correct message is received. To know the correct order of messages the Synchronization message handler could use the synchronization specification of the component interface (level 3 of the component interface).
The Component System & Embedded Software Development
In this section we will look at the opportunities offered by the SEESCOA component definition for embedded software development. The discussion is split in two parts: the first part looks at the implications for software development in general. The second part focuses on embedded software.
Opportunities for software development
A problem that often comes back, is the lack of component reuse over several projects or development teams in a company. To make reuse possible, components have to be defined in a formal way to eliminate misinterpretations. Without a clear definition, we cannot talk about reuse - because we don't even know what is reused. That's why the definition is quite formal on some points. Some parts of the definition have still to be filled in, for example the languages that will be chosen to specify semantics and synchronization are still an open issue.
It is also important to notice that a clear definition doesn't imply the correct use of components. To use and reuse components a method is needed. This method should enable the discovery of reusable components. A general guiding rule is the high cohesion - low coupling rule. High cohesion means that when one develops a component he should only put functionality in it that is related. A component that does everything is not reusable. Low coupling is also needed between the different components. If low coupling is not maintained, the involved component cannot be reused without also deploying the other components to which it is coupled. This also breaks reuse. To summarize, not only a good definition is needed, but also a good method.
So, what are the consequences of the component definition for the software development?
First of all, in our definition, a component has to be named and versioned. The naming and versioning enables the unique referencing of components. The importance of this naming and versioning is quite present for companies, since several people will develop components and others will need to use them. It is clear that this should be done in a uniform way. The naming and versioning also enables the storage of a component in a catalog; this catalog can then be browsed when looking for a specific component.
A second argument in using a component system is the ability to use a very open meta level architecture. As demonstrated throughout the tutorial, we can write glue component very easily. Two reasons for this are 1) we don't wait for other components 2) we have a very explicit message handling service, which can be tuned by glue components.
Opportunities for embedded software development
Besides the advantages shown above, the component system also has additional advantages for embedded systems.
The component system helps in debugging the developed software: it can intercept the sent messages between the components. This enables logging of messages or events together with timing information, which can help the debug process. As stated previously, the component system can also check if the components adhere to what is specified in their outside view.
Another advantage of using the asynchronous way the component system enforces is that it allows different kinds of scheduling. For example, if we are targeting a small or mid scaled embedded system we may be unable to use multiple threads. On such a system we can easily ask the component system to run everything in one thread.28
The Future of the Component System
This section contains some open ended issues regarding the component system. These are currently implemented in a bad way or not implemented at all. Below is the list of things which should be changed in future versions of the component system. The list is given in order of priority:
High Priority
-
A precompiler syntax for creating components. Together with this we need the ability to pass parameters to the Init message.
-
The precompiler should be able to declare components extending from classes which does not inherit from 'Component'.
-
Put a transparent distribution layer into the component system.
-
The Component-System Component: It can be an advantage to do the interfacing to the component system as if it were a component itself. This has the advantage that whenever we work in a distributed environment the component system can always be reached with the same identifier. Another advantage is the possibility of tuning the component system with a larger, more manageable component system-component, which will be removed in the production version of the system.
-
Introspection/Reification & Absorption: Introspection is needed whenever we are faced with dynamic components that want to change their name at runtime, dynamic components that look for their communication partner in the system and components which change their behavior at runtime. The possibility for remote/runtime uploads depends heavily on this feature. However it may not be necessary to create a full reflective system in which we can absorb certain kinds of primitives and workings into the component system.
-
Add Versioning to component blueprints
-
Investigate the possibilities of a semantic Time Constraint Checker with SSEL
-
Investigate the Scheduler of the KUL.
-
Investigate the possibilities of Record/Replay facilities Gent.
Low Priority
-
Some glue code syntax. (Transformers, Grouping components and others)
-
Declaring the used message fields in a thunks header. This allows more straightforward rule-generation.
-
The precompiler should output some nice indented code, not the flat line format it uses now.
-
Profile it on the target architecture. Together with this we need to remove the TreeMap from the source because Kaffe has a wrong implementation of this standard Java class.
-
Discard messages with timestamps
-
Somebody will have to put in runtime support for contracts (see the design related documents)
References
[Szyperski] Component Software, Addison-Wesley/ACM Press, 1997
[Beugnard, Jezequel, Plouzeau, Watkins] Making Components Contract Aware, Computer (IEEE), 1999
[Della Torra Cicalese, Rotenstreich] Behavioral Specification of Distributed Software Component Interfaces, Computer (IEEE), 1999
[Francis D'Souza, Cameron Wills] Objects, Components, and Frameworks with UML: The Catalysis Approach, Addison-Wesley
[Van Belle, Verelst] The mobile multi-agent system Cborg, http://progwww.vub.ac.be/poolresearch/Cborg/
[Noble] Three features for Component Frameworks, WCOP '99
[Terzis, Nixon] Component Trading: The basis for a Component-Oriented Development Framework, WCOP '99
[Dong, Alencar, Cowan] Correct composition of Design Components, WCOP '99
[Sametinger] Software Engineering with Reusable Components, Springer, 1997
[Keller, Hoelzle] Binary Component adaptation, ECOOP '98
[Mezini, Lieberherr] Adaptive Plug-and-Play Components for Evolutionary Software Development, Object-Oriented Programming Systems, Languages and Applications Conference, SIGPLAN Notices vol 33, nr 10, 1998
[Cornwell] Reusable Component Engineering for Hard Real-Time Systems, PhD thesis, University of York, UK, 1998
[Rastofer] A Component Model for Distributed Embedded Real-Time Systems, GCSE '99 Young Researchers Workshop
[Nierstrasz, Tsichritzis] Object Oriented Software Composition, Prentice Hall, 1995
[Szyperski] Components and Objects Together, Software Development Magazine, May 1999
1- For example, database applications written as if they are standalone programs will receive a message and send an answer back to the caller some time later while the originating component can do other things. Written in the other way, the database component will block the sender which is not reusable without writing adapters and other middle ware.
2- We actually don't have to copy the evnt. We can treat the event as read-only or we can transfer ownership upon the event from one component to the other.
3- This implies that a component should seldomly use the synchronized keyword
4- Please fix the classpath before calling the Tranformer
5- When using the term 'version' here, the 'implementation version' of the component is meant, not the version of the component's interface (like COM). Currently the component system has no explicit versioning support.
6- This direct mapping from name to reference simplifies dynamic binding. (as described in the 'Component Working Definition' deliverable.
7- It may look a bit overkill to have such a strict naming convention but it is absolutely necessary since we have no compile time name checking algorithm. So, there is a difference between HttpdInstance and HTTPDInstance.
8- Sometimes, component is overloaded in other packages so it is possible you have to write extends component.system.Component
9- The reason behind this code/data separation between components is called 'distribution'
10- Notice that the first method is preferred because it allows us to do java-compile-time checking. If we are smart we define all the component instance names as static final string constants somewhere.
11- In the future we will probably add some wrapper-invoker which actually calls the messages with correct object names.
12- This syntax can help some smart precompiler to do type checking before the code actually runs. (This will be necessary)
13- As a side note, the Return field is automatticaly filled in by the component system. Return is passed as a field in the incoming message.
14- This may sound as splitting hairs but it is not. If we work in a distributed environment this means that we don't have to pass these extra objects over the cable.
15- In the future we will probably make use of three kinds of messages. The first one will be called 'Init' (without fields) to initialize the component to a certain state. The second one will be called 'Setup' with any parameters passed to the createComponent method, and the last one will be called 'Reset' which will bring the object back to a certain state.
16- I have to admit that the terminology was not entirely clear.
17- In a latter stage we may add some timing behavior of these kinds of active messages.
18- We know that the current delivery order is a messy thing and we hope to use (misuse) the hidden parameters to specify some kind of order or priority on the messages which are being executed.
19- Which means that component A while executing the Test message sends to component B messages A1 and A3 and sends to component C message A2. (in left to right order)
20- Of course if only Test is send to component A
21- Please note that this wait component is far from being complete, nevertheless it gives an idea how we can synchronize components with each other.
22- It could be possible to print bit by bit the production on the screen, but this is barely readable if we start the component system using a number of threads.
23- These were maxEndTime, minStartTime and maxStartTime. See also D 3.2.a.
24- Of course, this is only true if no time elapsed between the sending of the message by component A and the receiving of the message by TCRPH.
25- Every scheduler has to implement this interface.
26- “At the same time” means here: before the elapsing of 10 msec after A sends o(). If q() is send after these 10 msecs, then the absolute deadline of q() will be later than the absolute deadline of o() and as a result q() will be scheduled after o().
27- System.currentTimeMillis() is a java method to retrieve the time (in milliseconds) elapsed since midnight, January 1st 1970
28- This is completely impossible if we would write the software in a process-based way instead of an event based way.
| http://werner.yellowcouch.org/ werner@yellowcouch.org |  |