| Home | Papers | Reports | Projects | Code Fragments | Dissertations | Presentations | Posters | Proposals | Lectures given | Course notes |
|
|
Refinement of the SEESCOA Component ArchitectureWerner Van Belle1* - werner@yellowcouch.org, werner.van.belle@gmail.com Abstract : This document describes the refinements we have made to the component architecture over the past 9 months. First we describe some of the esthetic things we've added to the system. These smaller refinements include the addition of a port principle. We've changed the initialisation procedure of components and other small things. In general this first section describes how one can use the component system now. The second part of this document describes some larger design enhancements, mainly to see with reification of components. This section delves a bit deeper into the component system. It discusses the why and how of the architecture. The last part describes how the component system has been made to work in a distributed context. This section also discusses why we didn't use Jini for making the component system distributed.
Keywords:
meta level architecture connection oriented open distributed system seescoa component system |
Contents
- List of Figures
- List of Tables
- 1. Introduction
- 2.
Usage Of The Architecture
- 3.
The Component Architecture Design: Internals
- 3.1 The failure of the Existing Architecture
- 3.2 Improved Message Handlers
- 3.3 The Interpreter Core
- 3.4 How about Ports, Multiple Ports, Multiports ?
- 4.
Making the Component System Distributed
- 4.1 Peer to Peer vs Client Server
- 4.2 Error Handling & Partial Failure; Quality Of Service
- 4.3
Writing the Portal
- 4.3.1 Overtaking the original Component System
- 4.3.2 Creating new Components
- 4.3.3 Finding and Referring other Component Systems
- 4.3.4 Passing through all outbound messages
- 4.3.5 Passing unhandled messages through to the component system
- 4.3.6 An Example
- 4.3.7 The Infrastructure port to The Portal (0<=noi<=1)
- 4.4 Error Handling, 2nd Round: The Controller
- 4.5 Why we didn't use Jini
- 5. Conclusion
- Bibliography
List of Figures
- 2.1. Creating a Component
- 3.1. MSC illustrating the sending and receiving of messages. The object level are the lines of code written by the component developper. The meta level is the interpreter that takes care of delivering messages.
- 3.2. MSC illustrating the sending and receiving of messages by means of proxies. Only A has been proxied.
- 3.3. Using components as ports.
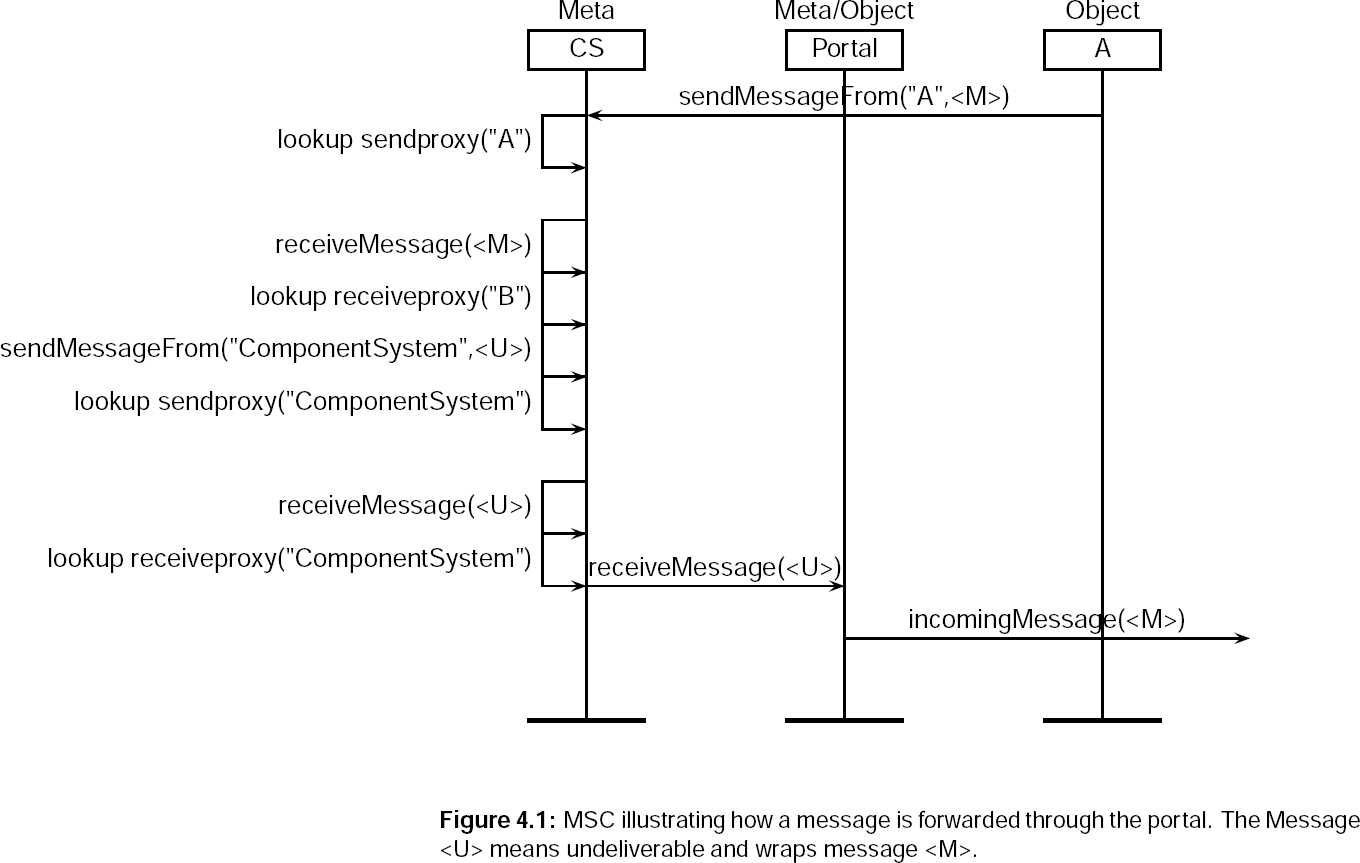
- 4.1. MSC illustrating how a message is forwarded through the portal. The Message <U> means undeliverable and wraps message <M>.
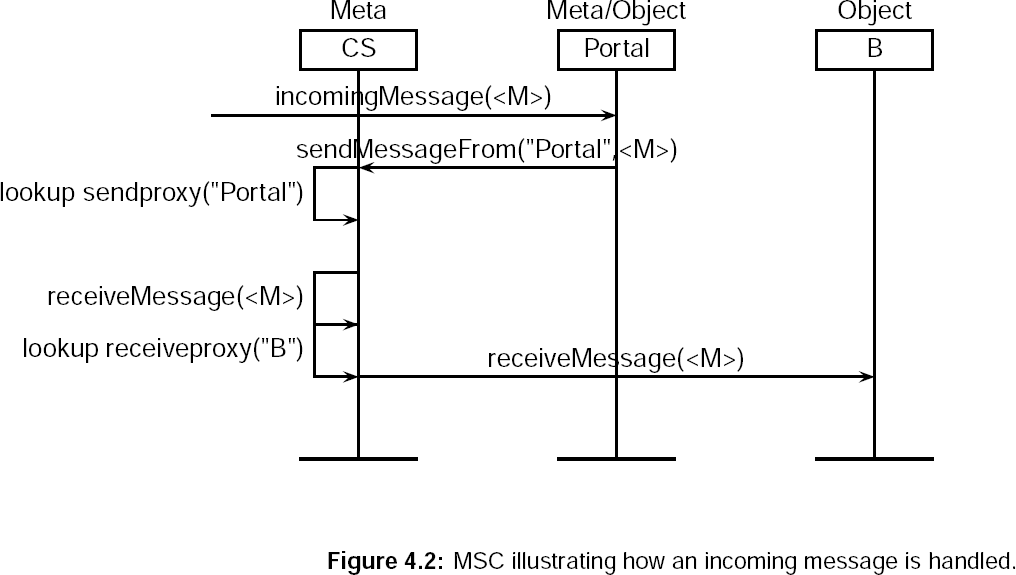
- 4.2. MSC illustrating how an incoming message is handled.
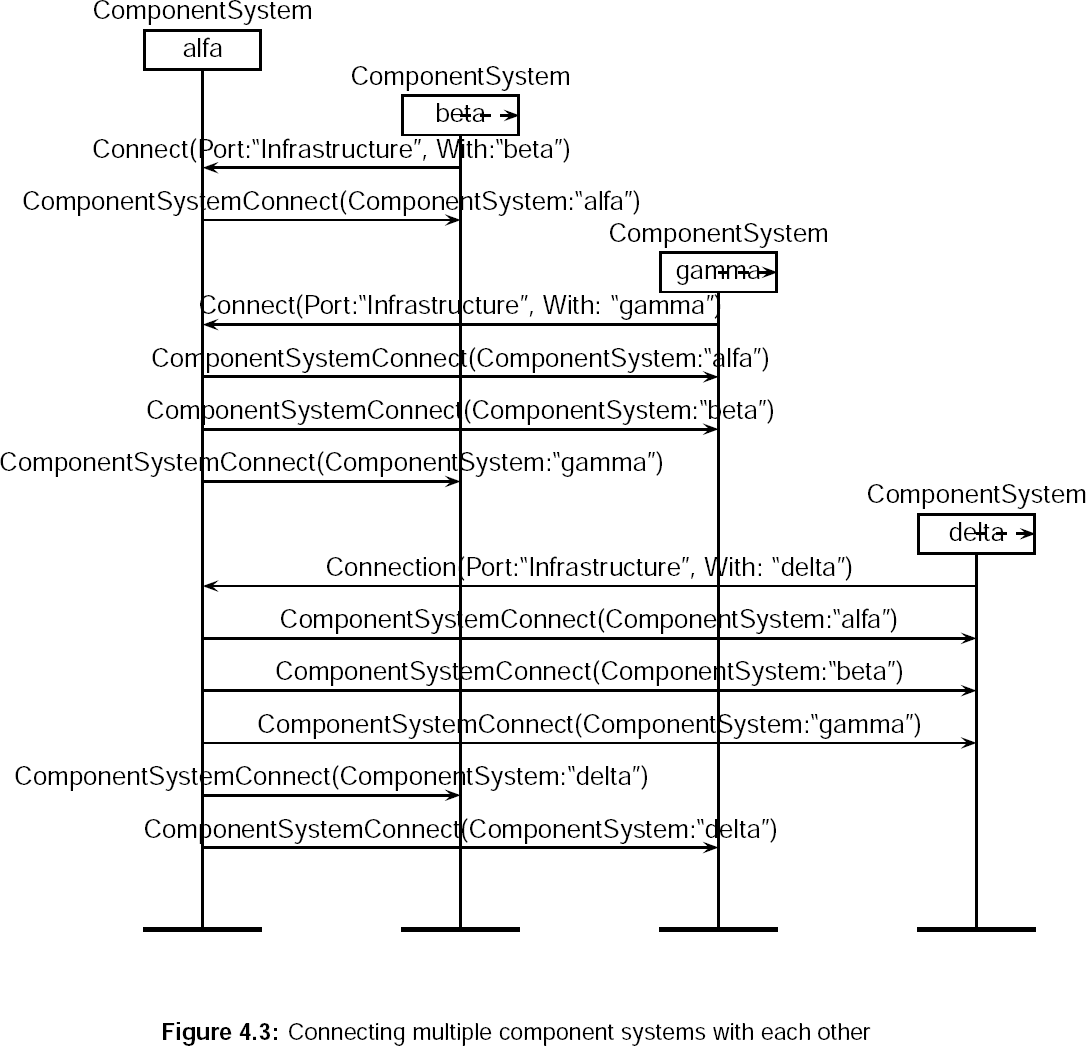
- 4.3. Connecting multiple component systems with each other
- 4.4. Disconnecting a component system
List of Tables
- 3.2. Original setup. Component A, B, C in peace next to each other.
- 3.4. If B becomes a proxy for A, B has to create a new name for A and take over A's original name.
- 3.6. If now, C becomes a sending proxy for B, all messages send from A has to be handled by C.
1. Introduction
This document describes the refinements we have made to the component architecture over the past 9 months. First we describe some of the esthetic things we've added to the system. These smaller refinements include the addition of a port principle. We've changed the initialisation procedure of components and other small things. In general this first section describes how one can use the component system now. The second part of this document describes some larger design enhancements, mainly to see with reification of components. This section delves a bit deeper into the component system. It discusses the why and how of the architecture. The last part describes how the component system has been made to work in a distributed context. This section also discusses why we didn't use Jini for making the component system distributed.
2. Usage Of The Architecture
The component system is the infrastructure (framework, architecture, or kind of operating system), which makes component instances work together, which glues them and creates a homogenous environment for them. The component ssytem can be seen as the middle-ware which connects different components and which makes them work together.
The component systems offers this functionality by means of asynchronous message sending. This was documented in deliverable 3.3b. []
2.1 On board
One of the first things we absolutely needed was the ability to run the component system and the demos on the camera-board. This was no problem, except for some minor version mismatches between the Java virtual machines. Notable were the problems with different versions of the AWT.
A second problem we had to solve was the long development cycle. Writing code, sending it to the client, starting and debugging takes a long time if you don't have a good synchronisation tool. Therefore we added CVS to the board which allowed us to check out a .jar file which can be run immediately. This jar file is made on the deployment box by a simple make command with an automated CVS commit.
2.2 Boot Up
Booting the system is of course also a problem. We don't want a component 'system' which should be loaded from within the main progam. Instead we want a component architecture which is able to load other components, also including a main component. The component system is now started by loading the ComponentSystem class.
2.2.1 Using a certain scheduler
The parameters given to the main program are first checked for scheduler parameters. Possible schedulers are the Standard scheduler (std) , and an Earliest Deadline First scheduler (edf), although we didn't check whether this one still works or not. There is an experimental StupidScheduler (dumb) which doesn't guarantee orderly delivery and an extremely fast but single threaded OneThread scheduler (one). If no scheduler is given the standard scheduler is used. If we choose the standard scheduler or the stupid scheduler we can specify how much threads should be used at the same time. Examples are given below:
- java component.system.ComponentSystem scheduler:edf
java component.system.ComponentSystem scheduler:std
java component.system.ComponentSystem scheduler:std:2
java component.system.ComponentSystem scheduler:std:10
java component.system.ComponentSystem scheduler:dumb
java component.system.ComponentSystem scheduler:one
2.2.2 Tracing/Timing messages
If we want to trace messages or want to time messages we can use the special message fields at the command line. Tracing is done by specifying messages:trace, timing can be done by using messages:time. The minimum, maximum and average times are recorded. The total duration and count are also tracked.
- java component.system.ComponentSystem messages:trace
java component.system.ComponentSystem messages:time
2.2.3 Loading a certain component
Now, if we boot the component system we often want to specify which components should be loaded. To do this we specify a component field, that contains the blueprint (the full class name) of the component to be loaded. After that we specify the name of the instance we want this component to have. For example, if we want to load the Httpd example [] we can do this by
- java component.system.ComponentSystem \
component:component.examples.httpd.Httpd:yeah
2.3 Creation & Initialisation
There are some issues which have changed. (The reason why will be discussed in the Internal Design of the Component system). One of these is the creation of components. Instead of calling a CreateComponent upon the component system, we now send a CreateComponent to the ComponentSystem.
- ComponentSystem.createComponent(
``component.examples.httpd.Httpd'',
``Httpd'')
- ``ComponentSystem''..CreateComponent(
<Blueprint:``component.examples.httpd.Httpd''>,
<Instance:''Httpd''>)
- ...
message Init()
{
System.out.println(``Amount is ``+<Integer|Amount>);
}
...
- ``ComponentSystem''..CreateComponent(
<Blueprint:...''>,
<Instance:``Ola''>,
<Amount:new Integer(56)>)
2.4 component ComponentSystem
2.4.1 Description
The Component System component is a component which interfaces the component system to any other component. While designing the case we encountered the need to retrieve information from and put information into the component system in an uniform way. A uniform way in the sense that we 'send a message' to the component system, and not 'call a method upon the component system'. We needed the ability to treat the component system as if it were a component itself. This was necessary to make distribution easier. The actions the component system component should be able to undertake are
- Check correct working of internal Queues. Queues overflows should be reported
- Check correct interconnection with other component systems. Disconnects and connects should be reported
- Create new components.
- Destroy existing components.
- Retrieve all kinds of information from the component system, like for example: the name of the system.
- All other functionalities which are now accessed by means of plain method invocation. Except for the sending of a message itself. This still must be done by calling a method.
Creating a new component
When creating a new component, we ask the component system to create a new component from a given blueprint. This is done by sending a message to the component system. This is not done by calling a method upon the local component system. This allows us to send a CreateComponent message to another component system.
Retrieving notification of new component systems
When a new component system connects, we want to receive a notification of this event.
2.4.2 The Component Interface (0<=noi)
Belowm we discuss the interface a component will be able to use at the componentsystem.
- [in CreateComponent(BluePrint:<String>, Instance:<String>)]When retrieved the component system will create a new component with name Instance. Instance will be prefixed by the name of the component system and suffixed with a unique identifier. As such, when creating a new component, we don't know its name because its name is not the Instance. The name will be send back to Return2.1 by means of Instance. BluePrint is a string referring to the class file. Instance is a String.
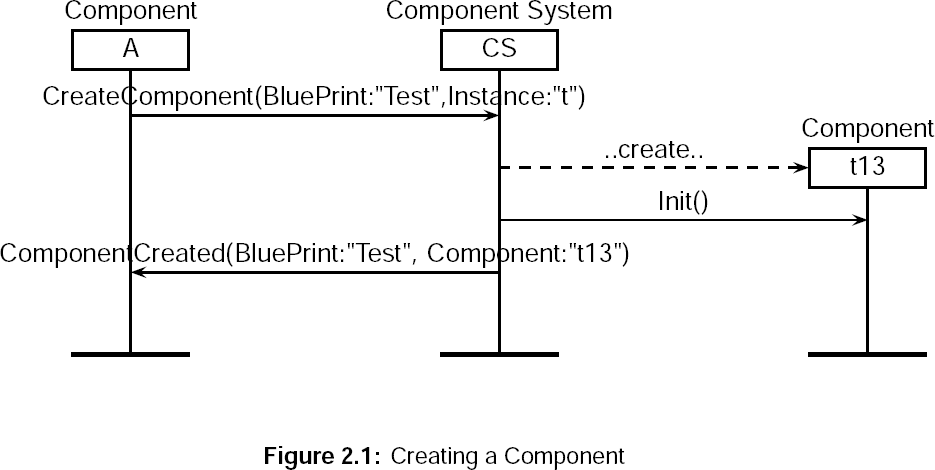
- [out ComponentCreated(BluePrint:<String>, Component:<String>)]Send out to the requester of a component-creation. The Blueprint is a copy of the original requested BluePrint. Component is the actual name of the created Instance.
- [in Init()]Is send out by the component system to all new created components. Since the component system component is a component, it will also receive this message. When received, the component system component will load all components which could be found on the command line.
- [out Init()]Is send out by the component system to new created components. Init is the first message which will arrive at a component.
- [in DestroyComponent(Component:<String>)]when retrieved, the given component instance will be removed from the component infrastructure. (If the component is at another component system, it will also be removed).
2.5 Tool
The component architecture is packaged with a tool, a component transformer, which is needed to convert .component files to .java files, which in their turn can be compiled. This tool has received two extra keywords, which are questioned at the moment of this writing. The first keyword is port, the second multiport. The port can be used instead of String. Multiport is a keyword which expands to Multiport, which is a descendant of a Vector. Anything send to a multiport will be delivered to all subscribed parties. Other components can connect to a multiport by sending a Connect message to a component. Eg. Component a is written as follows:
- componentclass A
- {
- port a;
- multiport b;
- }
-
A..Connect(<Port:``b''>, <With:A>)
3. The Component Architecture Design: Internals
This section describes the internal architecture of the component system. In this section we will illustrate the missing features of the original component system as well as the quite general solutions we offer.
3.1 The failure of the Existing Architecture
But first, we have to discuss the failure of the existing infrastructure. The existing infrastructure was not good enough because some very simple things were very hard to achieve. Below we summarise a number of shortcomings:
- Creation of components had to be done by an immediate call. In fact, the component system was like a black box which you had to call synchronously. This did not conform with our own requirement that everything should happen asynchronously. Access to the component system itself was done concurrently, which became quite hard to manage.
- Message handlers were a kind of mess, although very nice, they were completely useless if we wanted to make the system distributed. Their original goal of providing a uniform way to handle messages failed because message handlers were not components themselves. This required us to create stubs and proxies (with Java RMI) for every component we instantiated.
- Making the component system distributed required both of the above things. We needed the ability to send a message to another component system, which in turn should either create a component, handle a message or do something similar. On top of this we needed the ability to intercept failures of the local component system, which we could not do with the existing message handlers because they were also unreachable from remote systems.
- In the future, if we want to reason about the control flow of the system and want to enforce a certain ordering upon the system we might need the ability to change the complete message handling strategy. So anyhow, the basic component system support should make as less as possible assumptions about the use of it.
3.2 Improved Message Handlers
We improved the message handlers first by rewriting them completely. The goal of a message handler is the ability to see what a component sends out and to see what a component receives. On top of this the message handler should be able to filter the message at hand or reroute it.
3.2.1 Catching the received messages
Catching received messages is not really a problem in our system, we can easily reassign the receiver of a component to point to another component. Eg. If the component system has the name Alfa linked with component alfa and component Beta wants to see whatever Alpha receives it can ask the component system to create a new name Yamma which is bound to alfa. After that it rebind beta to Alfa, such that Alpha points to the actual component beta. If this is done, all messages send to the component ``Alpha'' will be received by component beta. Of course, instead of immediately handling the messages the component system should send a ReceiveMessage message to this proxy component. Beta can now look at the message and send it through to Yamma, which was the original A. This operation can be repeated as many times as necessary.
3.2.2 Catching the send messages
Now, when trying to catch the outgoing messages of a component we encountered a more difficult problem. Object Oriented languages are driven by the messages send to other components, they are not driven by the messages received. This means that we can relatively easy override the receiver of a component by acting as if, but it is quite difficult to catch outgoing messages since sending of messages are done immediatelly. We didn't want this ugly discrepancy, we wanted as much the ability to intercept messages being send as messages being received by a component. Even worse, we wanted to offer this in the same way. Just like an object first sees what a component would have received, we want to see what a component would like to send before it is actually send.
3.2.3 Filtering messages
To summarise, we see how all components can act as a sending or receiving proxy for a component. If they are acting as a proxy they receive ReceiveMessage and SendMessage messages. If they want to do something, like lets say, removing the message or passing it to somebody else, we have to look at the message. To both procedures the message is passed in the <Message> field.
3.2.4 Meta level control with a list ?
The first possibility to add in the component system was for every component a set of components which should see every message before it actually reaches the targeted component. This does not work because it is very difficult to intercept and stop messages this way. Furthermore the component system has a bit too much state in this scenario. If we want to make this distributed, things become much more difficult. So, a meta-level linked list is no good solution for catching incoming messages. Nevertheless, nothing stops you from creating your own object-level linked list by re-binding component names.
If we think about this solution for sending messages we also see the problem of intercepting outgoing messages, so this also is not useful.
3.2.5 Meta level control with sender/receiver components ?
The possibility we finally use is a set of tuples, every tuple containing three fields. The first field is the component which will handle the message, the second field is the component which will be used to send a message and the third component is the actual component which is overridden by both proxies. Proxying incoming messages is done by replacing the name of a given component with a new tuple. Catching the send messages is easily done by specifying a new sender-handler.
We will illustrate this below. Suppose we have component A which needs to be proxied for incoming messages by proxy B, Component C is the proxy for all outgoing messages. The original table 3.2, with nothing special in it. Table 3.4 shows how B becomes a proxy for A and table 3.6 shows how A is proxied by B and C.
|
|
|
3.2.6 Meta level control with a switching table ?
Of course, the small tables from above are not suitable if we want 20 sender-listeners on one component. Therefor we might think of introducing a cross table in which we have on the Y-axis the from field and on the X-axis the target field. In every box we put a sendmessage and receivemesssage notification, just as above. Of course this system takes unbelievable much space and is not much more flexible.
3.2.7 Meta level control with translation tables
A more flexible solution, but more time consuming is using something like IP-tables in which we specify a pattern of messages which will be translated to something else. Of course the problem with this kind of tables is their lack of management. It is quite easy to say that everything from component C to component B should be translated to ReceiveMessage upon D, but what happens if we create a proxy for C, either by redirecting everything first to us or by renaming C. In both cases we have unwanted behaviour. In the first, we see how it is impossible to add another extra proxy, in the latter we see how all rules already applying to C become invalid after renaming C.
3.3 The Interpreter Core
If we look at the meta object protocol of object oriented languages
we see things like sending messages waiting for the answer and
continuing.
Even the most simple (and accordingly most powerful) meta object
protocols[]
use a system in which the basic behaviour consists of sending a
message.
Nevertheless they are all synchronous. This doesn't work, therefore
approaches like [] are quite useful. Below is the
description of the meta level protcol used in the component system.
The working of the interpreter is described in the msc in figure 3.1.

The above figure contains a more ellaborate example. It shows how to use a proxying sender and receiver.
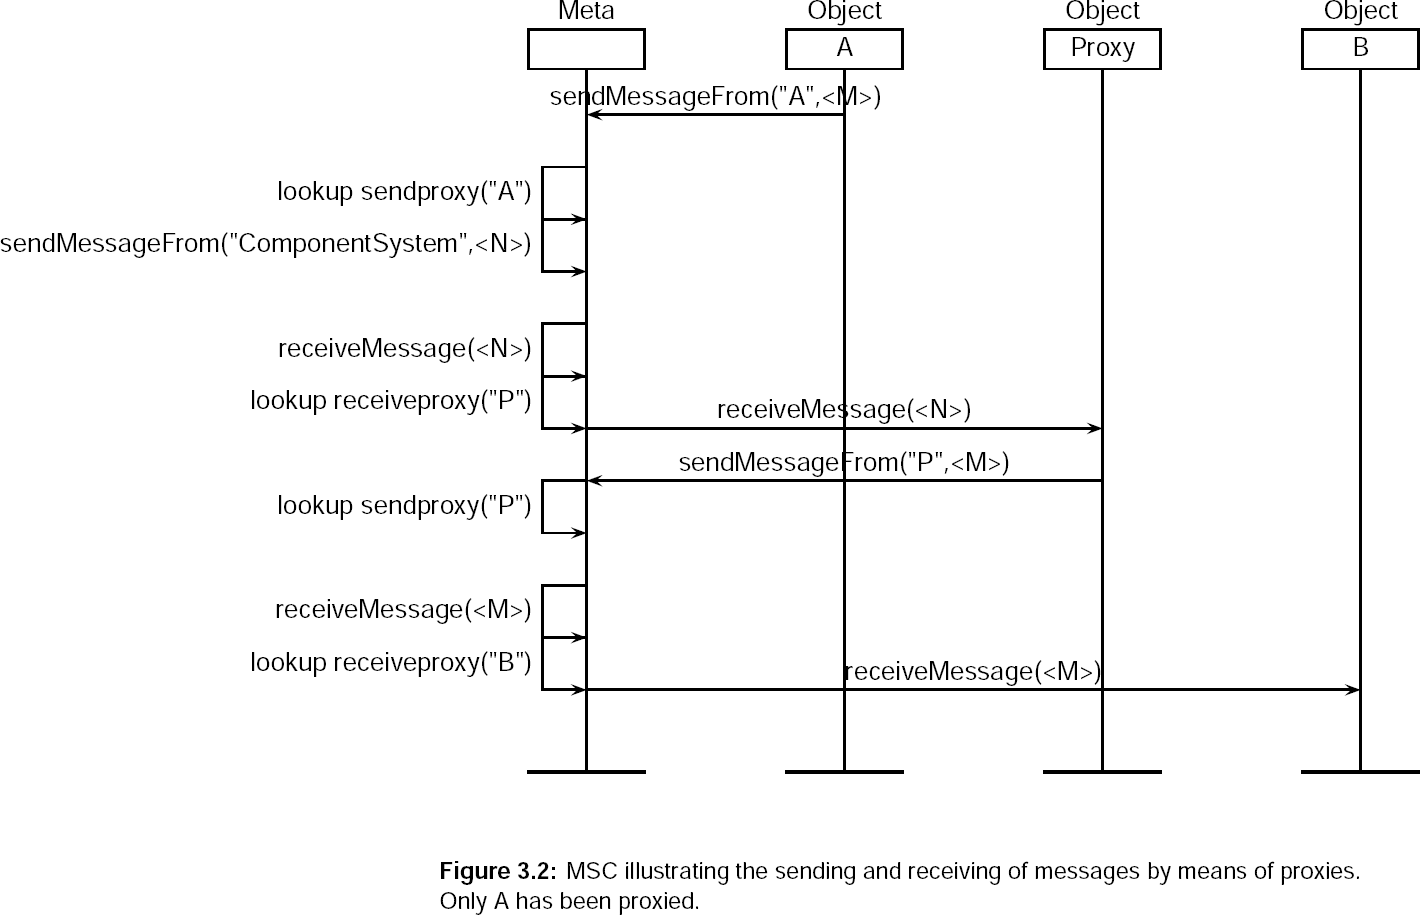
- public void SendMessage(String sender, Message m)
{
String proxy=names.lookup(sender).senderComponent;
if (proxy!=null) RequeueMessage(m,proxy,"SendMessage");
else scheduler.scheduleForExecution(m);
}
public void ReceiveMessage(Message m)
{
Object proxy=names.lookup(m.getTarget()).receiverComponent;
if (proxy instanceof String) RequeueMessage(m,proxy,"ReceiveMessage");
else (Component)proxy.receiveMessage(m);
}
3.4 How about Ports, Multiple Ports, Multiports ?
This meta level communication doesn't offer immediate connections. It is connectionless so to say. Of course, as everybody knows it is easy to add a connection-oriented protocol on top of connectionless protocols. Since we want to do this in an innovative way (with Contracts and Synchronization constrains placed upon these connections) we have to explain how we can create ports, multiple ports and multiports with the componentsystem.
The idea is simple, ports, multiports and multiple ports are also components. They have the name of the component to which they belong but are suffixed with the name of the port. So if component A has a port b,c, both ports will be components, called A/b and A/c. These two ports should be created by component A in the Init method. This is illustrated in figure 3.3.
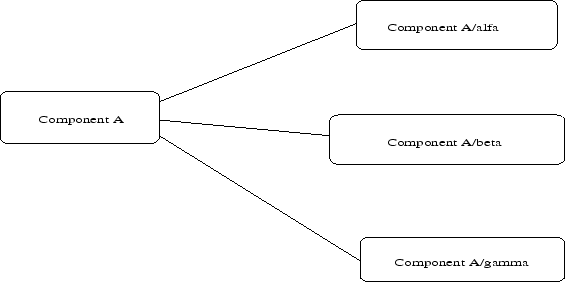
This allows very interesting uses of ports: we are able to see which messages are sent and received on a certain port by wrapping it an assigning new message handlers. This way some remote actions can be triggered if a port sents out something. Of course, this kind of usage is not advised because we better create an immediate link with the component in this case.
Another interesting use, is the use of higher level ports which offer some kind of subscribe/notify mechanism. Of course, the current component sytem offers special syntax for this, but we might as well remove this syntax because everything (and even more) can be done by using these kind of ports.
4. Making the Component System Distributed
The refinement of the component architecture also included a subtask which aimed at developing a distributed component system. We will now illustrate how easy this is done using the new meta-level architecture described above. But first, we need to have a look at properties of distributed systems.
4.1 Peer to Peer vs Client Server
A major question we have to ask ourselve when faced with the perils of distributed computing is whether we want to use a client server model or a peer to peer model. Both models have their strengths and disadvantages.
Client server computing allows us to offer a more or less secure environment in which we can control errors and in which one server knows what's happening. The backside of this is that most of the computers of the network are not used to their full capacity. This is where peer tot peer computing comes in.
Peer to Peer computing is a model in which all clients use and offer services to other clients. These can be seen as components sending messages to each other and reacting to incoming messages. Since we are using a component based development we would like to use peer to peer communication, with all the problems it brings with it.
4.2 Error Handling & Partial Failure; Quality Of Service
The biggest problem of peer to peer communications is the total chaos it creates. Components absolutely don't have a clue regarding the overall computation being performed. Nothing is wrong with that of course as long as the system does what it is designed to do. Problems occur whenever components start failing and whenever something bad happens to the system. In normal computer systems we either have the whole system failing or nothing failing, in distributed systems we can have at any moment in time a failure of part of the system. This is bad, because we cannot predict what will fail, nor can we devise a good error handling strategy to solve this.
So, how bad is this ? The badness depends on two things. First: how many components are there. If there are a lot of components running throughout the system we will see the probability of a component failing rising.[] The second thing is the rate at which the network fails. If it fails a lot, it is almost completely unmanageable to write correct working software. We might need a better data transfer control protocol than the ones being used and the ability to recover components which died. But this dependent very much on the quality of the environment, the quality of service required by the application so to say.
4.3 Writing the Portal
When making the component system distributed we will not create a new communication protocol, we will use a standard naming service (the java RMI registry) and use that one to find other partners. All component names will be prefixed by the name of the component system they are running on.
If we know the address of one of our communication partners we connect to it and as long as the connection exists we take it for granted that the other component is still functioning correct. If the connection is broken the component system will send a notification to all subsribed components. So, the only client/server architecture is the naming system. There exist better naming and routing systems but they are beyond the scope of this project[].
The communication is initial done by means of Java RMI . Java RMI is solely used as a transport medium, not as a distributed OO paradigm. In fact, we can easily replace Java RMI by socket calls, but as a first step the easiness of Java RMI was welcomed. The connections between components will all be passed through the same connections, so component systems are connected with each other and by absorbing a new communication protocol into the component system components will be able to send messages to other remote components without the hassle of compiling stubs, creating proxies, finding them etc etc.
To do this, we will create a component which overtakes the original component and adds some functionalities. This component is called the Portal and manages all outgoing connections as well as all incoming connections. The following sections illustrate how this is done.
4.3.1 Overtaking the original Component System
The first thing we need to do is to overtake the standard component system. We do this in the Init method.
{
// 0. Look up our own unique local name
hostname=InetAddress.getLocalHost().getHostName();
int portnr=findPort();
hostname=hostname+":"+portnr;
// 1. The original component system will be prefixed with two __
localComponentSystem=hostname+"/__ComponentSystem";
ComponentSystem.bind(localComponentSystem,"ComponentSystem");
// 2. Rebind the ComponentSystem name to this component.
ComponentSystem.rebind("ComponentSystem",name);
// 3. Bind a suitable name for this component
ComponentSystem.bind(hostname+"/ComponentSystem",name);
// 4. Create a listen component
listener=new PortalListener(this);
// 5. Announce this component in the registry
Naming.rebind(hostname,listener);
}
4.3.2 Creating new Components
We have initialised a new, better, component system. Now we need the ability to find other components. This means that all components created in the system needs a global unique name. This can only achieved by overriding the CreateComponent method. The new method will prefix the machine name to every instance. Eg. If component A asks an instantiation of blueprint T, with instance name t, the portal will create an instance cubical:2039/t. The portal does this as follows:
{
copyFields();
<Instance:hostname+"/"+<Instance> >;
forwardMessage(localComponentSystem);
}
4.3.3 Finding and Referring other Component Systems
Setting up a connection with another component system can be done by calling the Portal with a ConnectWith call. We thought of making connections automatically, but it turned out that setting up connections is part of error recovery which cannot be implemented, without domain knowledge. So, initiating a connection is left to the user of the Portal.
- message ConnectWith()
{
// 0. if we have to connect to ourselves we don't do anything
if (hostname.compareTo(<String|Addr>)==0) return;
// 1. ask the rmiregistry for a stub
PortalInterface portal=(PortalInterface)Naming.lookup(<String|Addr>);
// 2. remember the stub for the given address
portals.put(<Addr>,portal);
}
4.3.4 Passing through all outbound messages
Everything is in place. We have overridden the component system, we create components with a new name, we can connect with other component systems, now we need to change the meta communication protocol used between components. We will do this by overriding the Undeliverable messages. All messages which are not deliverable will be passed to the component system, since the portal is the new component system, it will receive these Undeliverable messages.
-
message Undeliverable()
-
{
-
// 0. look up the target address of the undeliverable
-
Message m=<Message|Message>;
-
String target=(String)m.getField("Target");
-
String machine=target.substring(0,target.indexOf("/"));
-
// 1. is there a portal for this kind of messages,
-
// we forward the message to it, otherwise
-
// we pass it to the original component system
-
PortalInterface portal=(PortalInterface)portals.get(machine);
-
if (portal==null)
-
{
-
<Message:m>;
-
forwardMessage(localComponentSystem);
-
}
-
else
-
portal.incomingMessage(m);
-
}
4.3.5 Passing unhandled messages through to the component system
A last thing we need to do is to pass all unhandled message through to the component system. We could do this by rewriting them and forwarding everything, but this is a bit too complicated and absolutely not good. It is not good because another new component system may add extra messages (like for example the portal with its ConnectWith message) which we could not foresee. Therefore we will change the ReceiveMessage a bit. (ReceiveMessage is called whenever a component receives a message, but doesn't have a method to handle it)
- message ReceiveMessage()
{
Message m=<Message|Message>;
m.putField("Target",localComponentSystem);
sendMessage(m);
}
4.3.6 An Example
We will now illustrate what happens whenever the portal sends something through to another system. Let's say component A has to send message a message M to component B. Component B is on another machine, so message sending will go trough the portals. The msc can be seen in figure 4.1 and 4.2.
4.3.7 The Infrastructure port to The Portal (0<=noi<=1)
The component system has a number of ports. If we want to use the portal component system, we might need an extra infrastructure port. This port notifies all connected components if something happens in the component infrastructure. The component infrastructure is the connection of a number of component systems.
- [out ComponentSystemConnect(ComponentSystem:<String>)]All component systems will send out this message when a new component system connects somewhere to the component infrastructure. ComponentSystem is the name of the component system connected. It is a Java String and can be used as a reference to send messages to that component system.
- [in Connect(Port:<String>, With:<String>)]If a component system receives a connect message on the infrastructure port. It knows that there is a new component system joining. It will immediately send out the content of the infrastructure port, send out a ComponentSystemConnect over the infrastructure port and finally update the infrastructure port.
- [in Disconnect(Port:<String>, With:<String>)]If a disconnect is received on the Infrastructure port, we will send a ComponentSystemDisconnect to the current port and remove the component system from the port.
- [out ComponentSystemDisconnect(ComponentSystem:<String>)]All component systems in a component infrastructure will send out this message whenever a component system disconnects. The component infrastructure is the interconnection of different component systems. The argument ComponentSystem contains the name of the disconnected component system. It is a Java String.
- [out ComponentSystemFailed(ComponentSystem:<String>)]All component systems in a component infrastructure will send out this message whenever a component system disconnects because the network fails. The argument ComponentSystem contains the name of the disconnected component system. It is a Java String.
- [out ComponentConnect(Component:<String>)]All component systems sends out this message whenever a new component has been created.
- [out ComponentDisconnect(Component:<String>)]All component systems sends out this message whenever a new component is disconnected from the system.

- [out ComponentFail(Component:<String>, Reason:<String>)]All component systems sends out this message whenever a component fails and crashes.
- [out ComponentSystemQueueOverflow(ComponentSystem:<String>)]Is send out by a component system to notify of Queue Overflows. This shouldn't happen in the component system if programmed and used correct. It nevertheless is easy to do. Suppose we have a producer which produces images at 50 Hz, suppose we have a consumer which consumes images at 25 Hz, in this case and because a sendMessage never waits, the receiving Queues will grow and eventually overflow.
- [in AreYouAlive()]Sender of this message asks whether this component system is alive or not. If it is alive it should send back an Alive message.
- [out Alive(Who)]is send in response to an incoming AreYouAlife request.
- [in RequestComponentList()]The sender request a complete list of all the components running in the system.
- [out_ComponentList(ComponentList:<String[]>)]Is send out in response to a RequestComponentList.
4.4 Error Handling, 2nd Round: The Controller
Now, back to error handling. Error handling is application dependent and environment dependent. We aim at systems with a good working TCP/IP network (and TCP/IP stack). Failures which can arise consists of switching of a camera, switching of the network (a router for example) or failure of the central storage. In any case, the application may want to act differently. The controller is the instantiation which will keep track of component systems which should be connected. If something goes wrong, the controller will either queue outgoing messages (if they are important) or throw them away.
Furthermore, the controller will try to set up a connection again as soon as possible. The relevant tasks of the controller are described as follows:
- Components can subscribe themselves to receive notification of connection and disconnection of components
- If new components connect or reconnect, all interested components will be notified.
- If components die or disconnect, the interested components will be notified.
4.4.1 Component Join & Disjoin
Components can subscribe themselves to retrieve notification of certain new components within the system. For example, a user interface component would like to subscribe to new cameras. The user interface component will receive from the controller a connect message when a new camera joins (or is created).
Disconnecting component can be initiated from anywhere. Every delete command must be send to the controller, which will ask all components to disconnect themselves. If they don't the controller will take action. We will now illustrate connecting and disconnecting
4.4.2 Component System Disconnection
At the moment a component disconnects because there was an error (crash in the component) or a network failure, all dependent components will be notified with a HasDisjoined message. The messages which trigger such an action are
- ComponentSystemDisconnect
- ComponentSystemFailed
- ComponentFail
- ComponentDisconnected
4.4.3 port ComponentSystem (noi=1)
- [in ComponentSystemDisconnect(ComponentSystem)]see description of the ComponentSystem component
- [in ComponentSystemFailed(ComponentSystem)]see description of the ComponentSystem component
- [in ComponentSystemConnect(ComponentSystem)]see description of the ComponentSystem component
- [in ComponentSystemQueueOverflow(ComponentSystem, Reason)]see description of the ComponentSystem component
- [in ComponentDisconnect(Component)]see description of the ComponentSystem component
- [in ComponentConnect(Component)]see description of the ComponentSystem component
- [in ComponentFailed(Component)]see description of the ComponentSystem component
- [out CreateComponent(BluePrint,]Name) is used to create all the necesarry components
4.4.4 multiport Controller (noi=1)
- [in LookingFor(NameSubstring)]Requests the controller to look for components with a name which contains the substring Name. In response to this message, the controller will send back all existing components and will from then on notify the requester of new components matching the given name.
- [out HasJoined(Who)]is send to notify everybody that Who has joined. This message is only send to all people subscribed to the given Name substring.
- [out HasDisjoined(Who)]is send as a notification of a disjoin. Is send only to subscribes components.
- [out Alife(Who)]is send out to check whether other component systems are still alive.
- [in AreYouAlife()]response of previous message
4.5 Why we didn't use Jini
The problems and solutions described in this deliverable, especially regarding distribution issues resembles Java Jini []. Nevertheless we don't want to use Jini because it has started wrong. Jini uses Java (and Java RMI) as a programming paradigm for distributed systems. This is a wrong starting point and makes life hard. We will illustrate this point in the next subsections.
4.5.1 An example piece of Asynchronous Java code: Learn to Listen.
In distributed systems, everything works asynchronously. Nothing works at the same time or rate. There are moments that services need to wait for each other, and there are times things run really concurrently. The amount of time things run synchronous compared to the amount of time where things run concurrently is very small. As such, using a synchronous programming paradigm (like object orientation and Java RMI) is not suitable. We can easily illustrate this with a simple peace of listen code. Suppose we send a message to some remote stub and want to say: 'if you are done calculating, please send me a message back'. If you want to say something like that you start writing code like:
-
- class FactorialListener
extends UnicastRemoteObject
implements FactorialDoneListener
{
public FactorialListener() throws RemoteException
public FactorialDone() throws RemoteException
{ .. override this if you want ...
}
}
4.5.2 A ``simple'' example of Jini Code: 3 pages 'Hello world'.
Now, using the same kind of argumentation, I will illustrate how some application can become a client of some Jini service. Like all other examples in this text i have omitted useless try/catch clauses. The example below is taken from []
- public class HelloWorldClientWithEvents extends HelloWorldClient
{
protected final int LEASE_TIME = 10 * 60 * 1000;
// An inner class to listen for events.
class MyEventListener
extends UnicastRemoteObject
implements RemoteEventListener
{
public MyEventListener() throws RemoteException {}
// Called when an event is received.
public void notify(RemoteEvent ev) throws ...
{
System.out.println("Got an event from: " + ev.getSource());
if (ev instanceof ServiceEvent)
{
ServiceEvent sev = (ServiceEvent) ev;
ServiceItem item = sev.getServiceItem();
HelloWorldServiceInterface hws;
hws = (HelloWorldServiceInterface) item.service;
System.out.println("Got a matching service.");
System.out.println("It's message is: " + hws.getMessage());
}
}
}
protected MyEventListener eventCatcher;
// Same as superclass, only create an event listener
public HelloWorldClientWithEvents() throws ...
{
eventCatcher = new MyEventListener();
}
protected Object lookForService(ServiceRegistrar lu)
{
Object o = super.lookForService(lu);
if (o != null) return o;
else registerForEvents(lu);
}
}
// Ask for events from the lookup service
protected void registerForEvents(ServiceRegistrar lu) throws ...
{
lu.notify(template,
ServiceRegistrar.TRANSITION_NOMATCH_MATCH,
eventCatcher, null, LEASE_TIME);
}
// Start the client.
public static void main(String args[])
{
HelloWorldClientWithEvents hwc = new HelloWorldClientWithEvents();
new Thread(hwc).start();
}
}
- // 0. Proxy object downloaded by clients
- class HelloWorldServiceProxy implements Serializable, HelloWorldServiceInterface
{
public HelloWorldServiceProxy()
{
}
public String getMessage()
{
return "Hello, world!";
}
}
// 1. Publishing the service
public class HelloWorldService implements Runnable
{
protected final int LEASE_TIME = 10 * 60 * 1000;
protected Hashtable registrations = new Hashtable();
protected ServiceItem item;
protected LookupDiscovery disco;
// 2. Inner class to listen for discovery events
class Listener implements DiscoveryListener
{
public void discovered(DiscoveryEvent ev)
{
System.out.println("discovered a lookup service!");
ServiceRegistrar[] newregs = ev.getRegistrars();
for (int i=0 ; i<newregs.length ; i++)
{
if (!registrations.containsKey(newregs[i]))
registerWithLookup(newregs[i]);
}
}
public void discarded(DiscoveryEvent ev)
{
ServiceRegistrar[] deadregs = ev.getRegistrars();
for (int i=0 ; i<deadregs.length ; i++)
registrations.remove(deadregs[i]);
}
}
// 3. Actual publishing
public HelloWorldService() throws IOException
{
item = new ServiceItem(null, createProxy(), null);
System.setSecurityManager(new RMISecurityManager());
disco = new LookupDiscovery(new String[] { "" });
disco.addDiscoveryListener(new Listener());
}
protected HelloWorldServiceInterface createProxy()
{
return new HelloWorldServiceProxy();
}
// 4. Register ourselves
protected synchronized void registerWithLookup(ServiceRegistrar registrar)
{
ServiceRegistration registration = null;
registration = registrar.register(item, LEASE_TIME);
if (item.serviceID == null)
{
item.serviceID = registration.getServiceID();
System.out.println("Set serviceID to " + item.serviceID);
}
registrations.put(registrar, registration);
}
public void run()
{
while (true) Thread.sleep(1000000);
}
public static void main(String args[])
{
HelloWorldService hws = new HelloWorldService();
new Thread(hws).start();
}
}
5. Conclusion
In this deliverable we have explained the work we've done to refine the component architecture. We have largely enhanced the meta communication protocol used in the component system, and we have illustrated the use of Meta level programming in distributed environments by making the component distributed. We have done this by writing a Portal component and absorb this into the component system.
At the end of the text we have made a provocative point: Java is not suited for programming distributed systems. We have argued that asynchronous message passing is what you want in a distributed system and showed that this is quite hard to implement in Java.
Footnotes
- ... Return2.1
- Return is one of the predifined fields offered by the component system. Return refers to the sender of a given message. Other predefined fiels are ``Target'', ``Invoke''. These are described in detail in []
| http://werner.yellowcouch.org/ werner@yellowcouch.org |  |