
The Heisenberg FM Synth was my first opportunity to write software that is actually used by quite a lot of people. It was part of the Audiotool online digital audio workstation.
For this synth I implemented the fast exponential envelopes, the filter module, drafted out the phase modulation kernel and implemented the wavetable bandlimitting. Although I don’t think the band-limiting was ever used in practice.
The content below is lifted from http://wiki.audiotool.com/doku.php?id=plugins:synths:h, which is distributed under a creative commons license. It gives an overview of the capabilities of the synth.
Heisenberg is a PM synthesizer which provides an enormous variety of sounds. Heisenberg offers a real choice regarding how sounds are created, users can work with Heisenberg as a subtractive synthesizer but it can also be configured to work as a phase-modulation synthesiser. There are 4 oscillators or operators which can each be configured to produce 1 of 49 different waveforms. After the operators comes the modulation matrix where it is possible to decide (if you want) what modulates what and what goes where. There are 3 exponential envelopes, 2 LFOs and a pitch envelope, all of which being tempo-sync enabled.
To finalize the sound or to just to add something extra there is a voice controlled filter-unit with adjustable low/hipass behaviour, resonance control and ordering options. The filter’s cut-off frequency can also be modulated by all envelopes (apart from the pitch envelope) and LFOs. Heisenberg also supports Unisono which means up to 4 different voices can be triggered by one note, with detuning and stereo separation for each voice.
Operators and Mod Matrix
The operators or oscillators are where the raw sound of the synth is set. There are 4 operators A, B, C and D, each of these operators can be set to play 1 of 49 different waveforms. What makes the Heisenberg special is that each wavetable based operator can be phase-modulated by each of the other operators, as well as this each operator can also be used to modulate itself. The modulation matrix also includes an amplitude modulation section where it is possible to use the envelopes and LFOs to modulate the amplitude of each operator and/or the filter’s cut-off frequency. Deciding what modulates what is done by plotting percentages in the modulation matrix, this is done by holding down the mouse and dragging up or down to add a value to the grid.
-
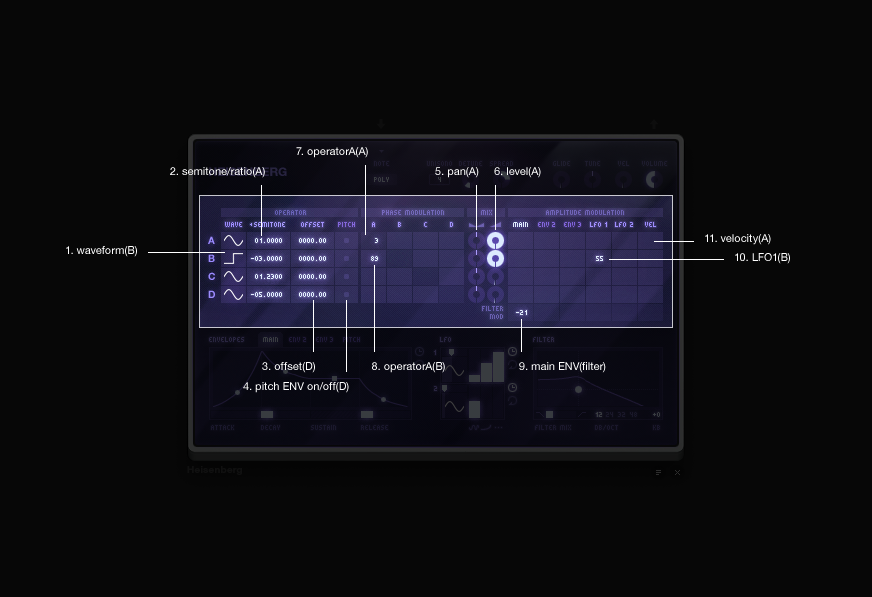
waveform(B) – Selecting the waveform image will navigate to the wavetable. The default waveform for all operators is a sine wave.
-
semitone/ratio(A) – This is where the frequency of the incoming note can be altered. This operator parameter includes 2 states, semitone and ratio. It is possible to toggle between the 2 states by selecting the parameter’s label (either semitone or ratio depending on what is selected). If the semitone is set to a value of 0 the frequency of the incoming note will not change. If the semitone value is set to 1 the operator will play the note 1 semitone higher than the incoming note. If ratio is selected the inputed values will multiply or divide the frequency of the incoming note. If the ratio is set to 1 then the frequency of the incoming note will not change, if the ratio is set to 2 then the operator will play the the incoming note 1 octave higher, if the ratio is set to 4 then the operator will play the note 2 octaves higher and so on.
-
offset(D) – Each operator includes a frequency offset. This function allows for frequencies to be added or subtracted from the operators frequency after the semitone/ratio has been set.
-
pitchENV on/off(D) – Each operator includes a button to enable the pitch envelope.
-
pan(A) – Panning for each operator.
-
level(A) – Level control for each operator (it is important to increase an operator’s level if you want to hear it).
-
operatorA(A) – The above example shows that operatorA is modulating itself with a value of 3%.
-
operatorA(B) – OperatorA is modulating operatorB with a value of 89%.
-
mainENV(filter) – The above image shows that the main envelope is modulating the filter with a value of -21%.
-
LFO(B) – This example shows that LFO1 is modulating the amplitude of operatorB with a value of 55%.
-
velocity(A) – The velocity column allows for the incomings note’s velocity to be used to modulate the amplitude of the operators and/or modulate the filter’s cut-off frequency.
Envelopes
The Heisenberg includes 4 envelopes, Main, ENV2, ENV3 and a pitch envelope. The mixed signal of the operators will always be going through the main envelope. ENV2 and 3 will only affect an operator’s signal if this is first specified via the amplitude modulation matrix. Each envelope can be used to dynamically modulate different targets at the same time, such as the level of each oscillator and/or the filter’s cut-off frequency. All envelopes can be also be tempo-synced and allow for the decay phase to be looped, as well as this the exponential slope (ADSR) of each state can also be modified.
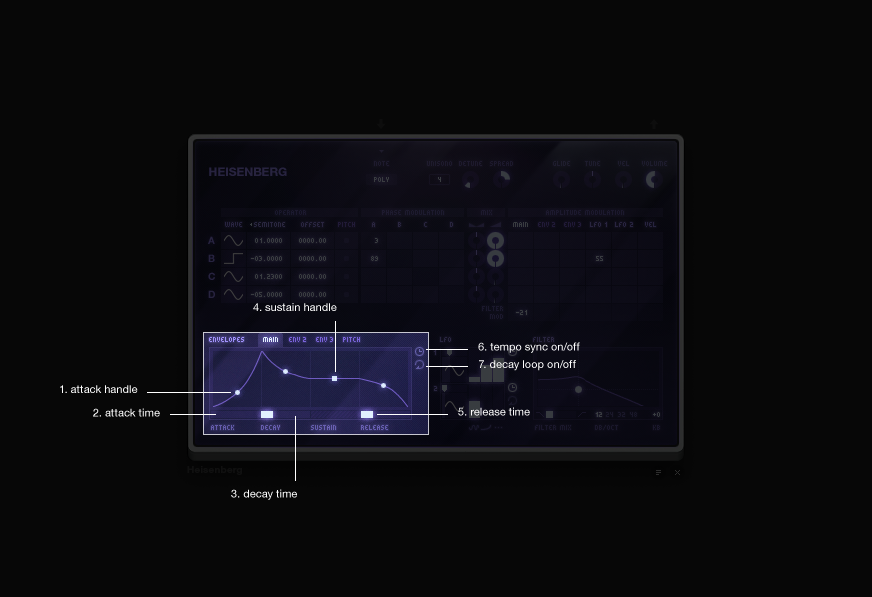
Below: The below image only shows the main envelope as an example since the main envelope and envelopes 2 and 3 all work in exactly the same way.
-
attack handle – Allows for the attack phase to be manually changed by dragging it around the display (although not labelled there are also handles for the each other phase of the ADSR envelopes).
-
attack time – The horizontal slider under the attack curve allows for the attack time to be adjusted.
-
decay time – Like the attack the decay also includes a horizontal slider which allows for the decay time to be lengthened or shortened.
-
sustain handle – Control over the duration of the sustain phase.
-
release time – Controls the duration of the envelopes release phase.
-
tempo sync on/off – Like the attack the decay also includes a horizontal slider which allows for the decay time to be lengthened or shortened.
-
decay loop on/off – Enabling this parameter will make it so that once the attack phase has passed the decay phase will be looped until the note is released.
Pitch Envelope
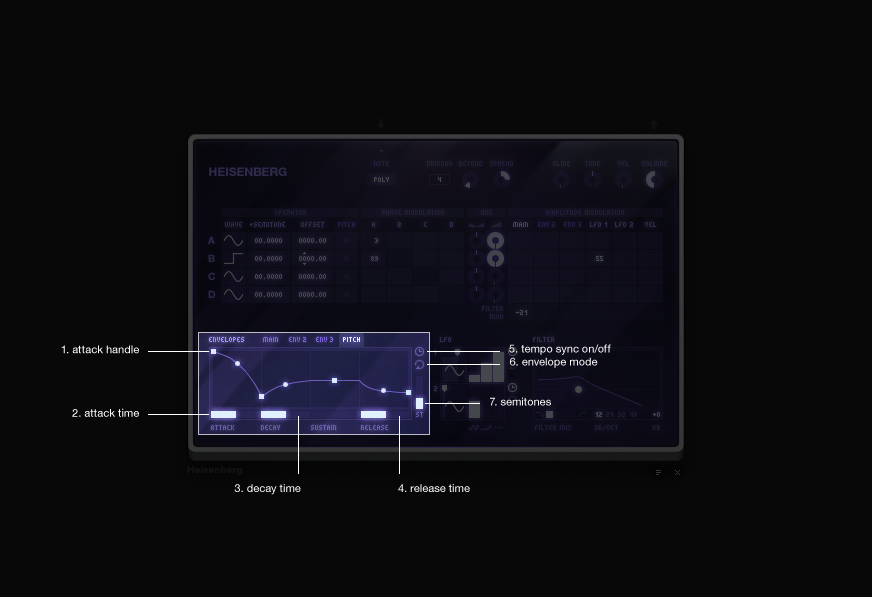
The pitch envelope works in a similar way to the other ADSR envelopes which are included in Heisenberg, the difference being that the pitch envelope is only affecting the pitch of the signal. In order for the signal from each operator to find the pitch envelope it must first be enabled by using the pitch envelope on/off buttons beside each operator. Like the other envelopes the pitch envelope includes handles so that the shape of the envelope can be manually dragged around the display.
-
attack handle – Allows for the pitch envelope’s attack phase to be altered by manually dragging the handle around the display. Although not labelled on the above image there are also handles for the decay, sustain and release phases of the envelope.
-
attack time – Just like the other envelopes the attack includes a slider which can be used to lengthen or shorten the duration of the attack phase.
-
decay time – Duration of the envelopes decay phase.
-
release time – Duration of the release phase.
-
tempo sync on/off – Control over whether or not the the pitch envelope is tempo synced or not.
-
mode – This is the same button as found on the other envelopes but in the case of the pitch envelope this controls the envelope’s mode. The pitch envelope has 3 modes; decay loop on, decay loop off and decay loop infinity. If set to decay loop on the envelope will complete the attack phase but then the decay phase will be looped until the note is released with the sustain and release phases being ignored. If the mode is set decay infinity then once the attack phase of the envelope is completed the decay phase will be looped forever, even if the note is released (forever!). If set to decay loop off the envelope will act as normal and will include all phases of the ADSR adventure.
LFOs
The 2 LFOs include the same wave table as the oscillators with 49 different waveforms to choose from. The rate of each LFO can set to a very slow oscillation of 0.01Hz (1 cycle every 100 seconds) up to 500Hz (audible range). Each LFO can be time-synced from 4 bars down to 1/256. The output from the LFOs can be delayed and can also be faded up to the maximum level (these timing can also be tempo-synced). Each LFO can be delayed and allows for the phase to be offset. The LFOs are activated by using the amplitude modulation matrix to plot what you want the LFO’s to modulate.
Below: The below image only references LFO1 since both LFO1 and LFO2 work in exactly the same way.

-
waveform – Select this button to specify which waveform the LFO will use. Choose 1 of the same 49 waveforms that is available with the operators.
-
phase offset – This slider allows specification of where in the waveform the LFO will start its cycle.
-
rate – Allows adjustment of the speed or rate of the LFO.
-
blend time – The blend time slider allows specification of how much the LFOs carrier wave is blended with dry (unLFOed) signal.
-
delay time – Control over how long it will take the LFO to start after the note has been played.
-
time sync on/off – Control over whether or not the LFO is tempo synced or not.
-
restart on/off – Control over whether the LFO will restart its cycle with each new note that is played.
Filter
The voice controlled filter is applied to each voice being outputted by Heisenberg. Heisenberg’s filter makes it possible to smoothly glide between the 2 filter modes (hipass/lowpass). The filter also includes a keyboard tracking option which includes positive and negative values. The filter allows the user to choose between 12, 24, 36 and 48 decibels for each octave.
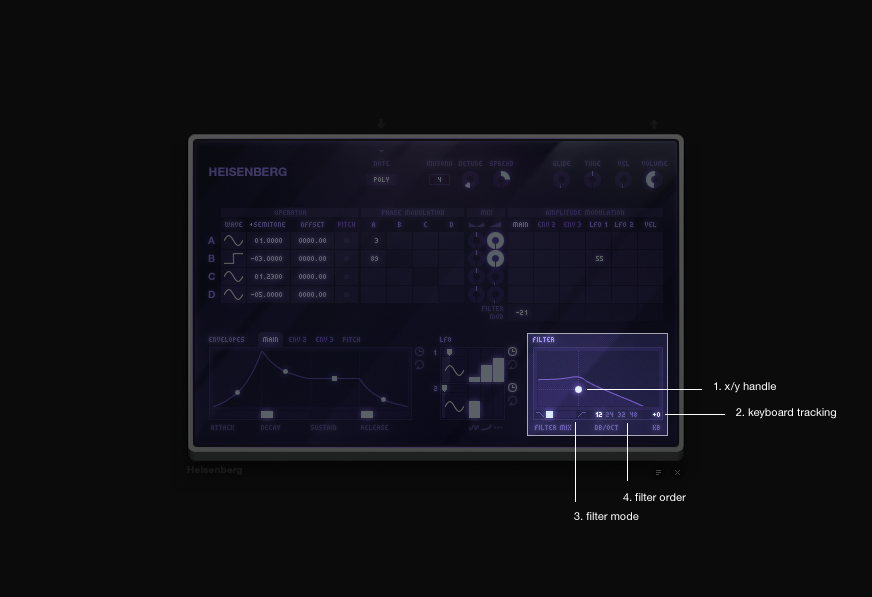
-
x/y handle – The x/y handle allows for both the filters cut-off frequency and resonance with one handle. The vertical axis represents the resonance with full resonance at the top and none at the bottom. The horizontal axis represents the filter’s cut-off frequency with low frequencies on the left side of the display and high frequencies on the right).
-
keyboard tracking – Allows control over how much the filter follows the pitch/frequency of the note being played. If the keyboard tracking is set at a positive value then the higher notes will be filtered with a higher cut-off frequency and the lower notes will be filtered with a lower cut-off frequency.
-
filter mode – The filter mode is in the form of a slider, this makes it possible to smoothly pass between lowpass and hipass modes.
-
filter order – The filter order controls the steepness of the filter’s curve.
Master
The master controls are where you can adjust the Heisenberg’s global controls for glide, tuning, velocity and volume. The unisono functionality is also included in the master controls. If Unisono is activated it will affect all of the waveforms being produced by the

-
noteIN – This input allows for the Tonematrix to be used to sequence Heisenberg.
-
play mode – The Heisenberg has 3 different methods of playing a note, mono, legato and polyphonic. When set to mono Heisenberg will only be able to play 1 note at a time. Legato behaves like mono only that with each new note that is played the main envelope will not be restarted and the release phase of the previous note will still be audible after the next note has started. Polyphonic makes it so that 2 notes can be played at the same time.
-
unisono – Unisono makes it possible to create multiple voices from the incoming note.
-
detune – Detunes the voices being created by the unisono function.
-
spread – Spreads the stereo of the voices being created by the unisono function.
-
glide – This controls how much the frequency of the incoming note will glide into the frequency of the next note.
-
tune – Global tuning.
-
velocity – The velocity controls how much Heisenberg cares about the velocity of the incoming note. The default setting for this parameter is 100% which means that Heisenberg is fully taking into account the velocity of the incoming note. If the velocity is set to 0% then Heisenberg will ignore the note’s velocity.
-
volume – Global volume control.
-
output – Output! This is how the signal is able to leave the device and be heard (plug this cable into the mixer).